在CoyoteAdapter的service方法中,主要干了2件事:
1. org.apache.coyote.Request -> org.apache.catalina.connector.Request extends HttpServletRequest
org.apache.coyote.Response -> org.apache.catalina.connector. Response extends HttpServletResponse
Context和Wrapper定位
2. 将请求交给StandardEngineValue处理
public void service(org.apache.coyote.Request req,
                        org.apache.coyote.Response res) {
    //
    postParseSuccess = postParseRequest(req, request, res, response);
    //
    connector.getService().getContainer().getPipeline().getFirst().invoke(request, response);
    //
}
postParseRequest方法的代码片段
connector.getMapper().map(serverName, decodedURI, version,
                                      request.getMappingData());
request.setContext((Context) request.getMappingData().context);
request.setWrapper((Wrapper) request.getMappingData().wrapper);
request通过URI的信息找到属于自己的Context和Wrapper。而这个Mapper保存了所有的容器信息,不记得的同学可以回到Connector的startInternal方法中,最有一行代码是mapperListener.start()。在MapperListener的start()方法中,
public void startInternal() throws LifecycleException {

    setState(LifecycleState.STARTING);
    findDefaultHost();

    Engine engine = (Engine) connector.getService().getContainer();
    addListeners(engine);

    Container[] conHosts = engine.findChildren();
    for (Container conHost : conHosts) {
        Host host = (Host) conHost;
        if (!LifecycleState.NEW.equals(host.getState())) {
            registerHost(host);
        }
    }
}
在容器初始化和变化时都会触发监听事件,从而将所有容器信息保存在Mapper中。之所以叫Mapper,因为它的主要作用就是定位Wrapper,而我们在web.xml里也配了filter/servlet-mapping。
另外,由上面的代码可知,在随后的请求路线中,Engine可有Connector获取,Context和Wrapper可直接由Request获取,Host也可由Request获取。
public Host getHost() { return ((Host) mappingData.host); }
上面的代码中还涉及到了两个很重要的概念--Pipeline和Value,我们不妨先一睹Container的调用链和时序图。

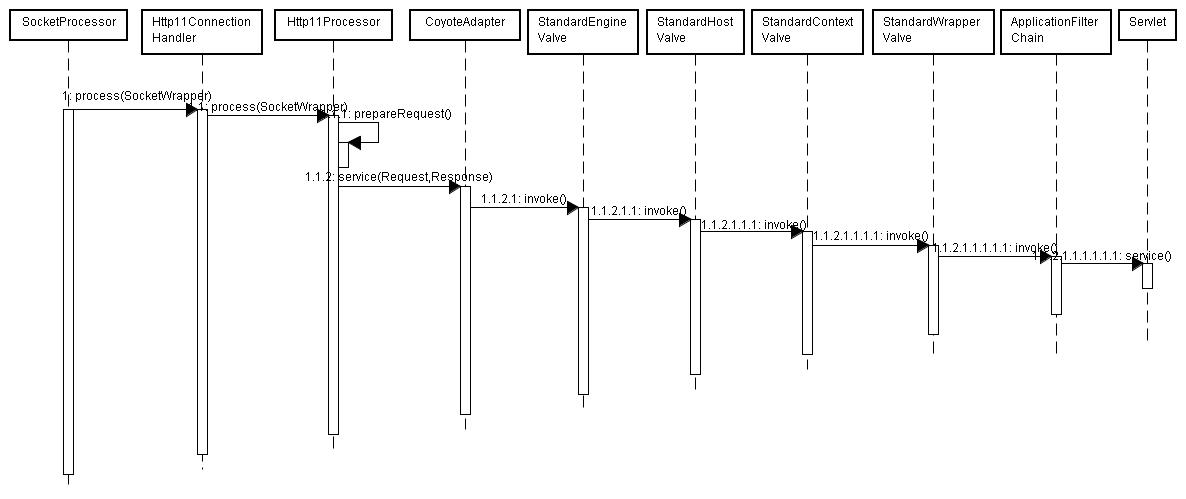
对于每个引入的http请求,连接器都会调用与其关联的servlet容器所绑定的一系列阀门(Value)的invoke方法,基础阀门(StandardXxValue)都在尾端,然后会逐步调用子容器的阀门。为什么必须要有一个Host容器呢?
在tomcat的实际部署中,若一个Context实例使用ContextConfig对象进行设置,就必须使用一个Host对象,原因如下:
使用ContextConfig对象需要知道应用程序web.xml文件的位置,在其webConfig()方法中会解析web.xml文件
// Parse context level web.xml
InputSource contextWebXml = getContextWebXmlSource();
parseWebXml(contextWebXml, webXml, false);
在getContextWebXmlSource方法里
// servletContext即core包下的ApplicationContext
url = servletContext.getResource(Constants.ApplicationWebXml);
在getResource方法里
String hostName = context.getParent().getName();
因此,除非你自己实现一个ContextConfig类,否则,你必须使用一个Host容器。
管道(Pipeline)包含该servlet容器将要调用的任务。一个阀(Value)表示一个具体的执行任务。在servlet容器的管道中,有一个基础阀,但是,可以添加任意数量的阀。阀的数量指的是额外添加的阀数量,即不包括基础阀。有意思的是,可以通过server.xml来动态添加阀。
管道和阀的工作机制类似于servlet编程中的过滤器链和过滤器,tomcat的设计者采用的是链表数据结构来实现的链条机制,引入了一个类叫ValueContext。值得注意的是,基础阀总是最后执行。
请求最终会被引导到StandardWrapper,本人也是首先从Wrapper这一层来入手Container的,直接看StandardWrapperValue的invoke方法
@Override
public final void invoke(Request request, Response response) {
    //

    requestCount++;
    StandardWrapper wrapper = (StandardWrapper) getContainer();
    Servlet servlet = null;
    Context context = (Context) wrapper.getParent();

    //

    // Allocate a servlet instance to process this request
    try {
       if (!unavailable) {
          servlet = wrapper.allocate();
       }
    } catch (Exception e) {}

    //

    // Create the filter chain for this request
    ApplicationFilterFactory factory =
            ApplicationFilterFactory.getInstance();
    ApplicationFilterChain filterChain =
            factory.createFilterChain(request, wrapper, servlet);

    //

    // Call the filter chain for this request
    // NOTE: This also calls the servlet's service() method
    //
    filterChain.doFilter(request.getRequest(), response.getResponse());
    //

    // Release the filter chain (if any) for this request
    if (filterChain != null) filterChain.release();

    // Deallocate the allocated servlet instance
    if (servlet != null) wrapper.deallocate(servlet);

// If this servlet has been marked permanently unavailable,
        // unload it and release this instance
        try {
            if ((servlet != null) &&
                (wrapper.getAvailable() == Long.MAX_VALUE)) {
                wrapper.unload();
            }
        } catch (Throwable e) { }

    //
}
上面代码中最重要的三处逻辑就是servlet实例的获取与卸载和filter链调用。我们先看卸载servlet实例的代码
@Override
    public void deallocate(Servlet servlet) throws ServletException {

        // If not SingleThreadModel, no action is required
        if (!singleThreadModel) {
            countAllocated.decrementAndGet();
            return;
        }

        // Unlock and free this instance
        synchronized (instancePool) {
            countAllocated.decrementAndGet();
            instancePool.push(servlet);
            instancePool.notify();
        }

    }
我们不考虑SingleThreadModel模型,因为较新版本的tomcat已经不用这种模型了(只有很老的版本才用),显然,通过上面的代码可以知道,基本上什么都不用做,而Single Thread Model常用的是池化模型(maxInstances=20)。下面给出加载servlet实例的代码
@Override
public Servlet allocate() throws ServletException {
      boolean newInstance = false;

        // If not SingleThreadedModel, return the same instance every time
        if (!singleThreadModel) {
            // Load and initialize our instance if necessary
            if (instance == null || !instanceInitialized) {
                synchronized (this) {
                    if (instance == null) {
                        try {
                            if (log.isDebugEnabled()) {
                                log.debug("Allocating non-STM instance");
                            }

                            // Note: We don't know if the Servlet implements
                            // SingleThreadModel until we have loaded it.
                            instance = loadServlet();
                            newInstance = true;
                            if (!singleThreadModel) {
                                // For non-STM, increment here to prevent a race
                                // condition with unload. Bug 43683, test case
                                // #3
                                countAllocated.incrementAndGet();
                            }
                        } catch (ServletException e) {
                            throw e;
                        } catch (Throwable e) {
                            ExceptionUtils.handleThrowable(e);
                            throw new ServletException(sm.getString("standardWrapper.allocate"), e);
                        }
                    }
                    if (!instanceInitialized) {
                        initServlet(instance);
                    }
                }
            }

            if (singleThreadModel) {
                if (newInstance) {
                    // Have to do this outside of the sync above to prevent a
                    // possible deadlock
                    synchronized (instancePool) {
                        instancePool.push(instance);
                        nInstances++;
                    }
                }
            } else {
                if (log.isTraceEnabled()) {
                    log.trace("  Returning non-STM instance");
                }
                // For new instances, count will have been incremented at the
                // time of creation
                if (!newInstance) {
                    countAllocated.incrementAndGet();
                }
                return instance;
            }
        }

        synchronized (instancePool) {
            while (countAllocated.get() >= nInstances) {
                // Allocate a new instance if possible, or else wait
                if (nInstances < maxInstances) {
                    try {
                        instancePool.push(loadServlet());
                        nInstances++;
                    } catch (ServletException e) {
                        throw e;
                    } catch (Throwable e) {
                        ExceptionUtils.handleThrowable(e);
                        throw new ServletException(sm.getString("standardWrapper.allocate"), e);
                    }
                } else {
                    try {
                        instancePool.wait();
                    } catch (InterruptedException e) {
                        // Ignore
                    }
                }
            }
            if (log.isTraceEnabled()) {
                log.trace("  Returning allocated STM instance");
            }
            countAllocated.incrementAndGet();
            return instancePool.pop();
        }
}
我们看到了:If not SingleThreadedModel, return the same instance every time
最后,我们来看看filterChain的执行,
@Override
    public void doFilter(ServletRequest request, ServletResponse response)
        throws IOException, ServletException {

    internalDoFilter(request,response);
}

private void internalDoFilter(ServletRequest request,
                                  ServletResponse response)
        throws IOException, ServletException {

    // Call the next filter if there is one
    if (pos < n) {
        filter.doFilter(request, response, this);
    }

     // We fell off the end of the chain -- call the servlet instance
     servlet.service(request, response);
}
显然,在调用web.xml里配的某个servlet时,都会先依次调用在web.xml里配的filter,这可谓是责任链设计模式的一种经典实现,方法的最后会调用servlet.service(request, response)。
一个Servlet到底有多少个实例呢,我们来看看官方的说明,在Servlet规范中,对于Servlet单例与多例定义如下:
“Deployment Descriptor”, controls how the servlet container provides instances of the servlet.For a servlet not hosted in a distributed environment (the default), the servlet container must use only one instance per servlet declaration. However, for a servlet implementing the SingleThreadModel interface, the servlet container may instantiate multiple instances to handle a heavy request load and serialize requests to a particular instance.
上面规范提到,
如果一个Servlet没有被部署在分布式的环境中,一般web.xml中声明的一个Servlet只对应一个实例。
而如果一个Servlet实现了SingleThreadModel接口,就会被初始化多个实例,默认20个
补充以下,一个Servlet在web.xml声明两次,会产生两个实例。
好了,现在你可以把前文中Connector执行过程和本文的Container执行过程结合起来了。我始终相信,深入一点,你会更快乐。


