
1、创建文件夹
创建文件夹主要是为了后面东西打包方便。名字随意。我这里创建名为:Macos
2、下载打印机驱动
打印机驱动格式一般是pkg格式,其他格式的暂未测试,如果是其他格式的可以直接看我的代码怎么写的参考一下我的逻辑。
3、创建配置文件
注意‼️:在刚才创建的文件夹下午创建,这一步创建的主要用作于存放打印机的一些信息的,分别为:打印机名称,ip地址,是否启用
参考一下我的示例,我在 Macos 文件夹下创建了一个无扩展名的文件,叫:Print。信息如下
打印机名称,ip地址,是否启用
杭州3L黑白,172.19.2.3,Y
杭州4L黑白,172.19.2.4,Y
杭州5L黑白,172.19.2.5,Y
杭州11L黑白,172.18.2.99,N
北京一楼零食区,172.16.24.11,N
北京HR办公室,172.16.3.161,N
4、创建密码文件
这一步是创建ini的配置文件,用于存密码的。创建文件名:
apperk-config.ini,文件内容如下
[SYSTEM]
PASS=""
DATE=""
DESCRIPTION="将输入的密码记录在临时目录中,防止安装重复输入密码,一般情况下重启电脑就会被自动清理"
5、写安装脚本
创建一个 名为:
install.sh的文件,文件内容如下
#!/bin/bash
#- - - - - - - - -- --Script comment information - - - - - - - - - -
#Author:                               拉基
#Email:                        helpdesk811@outlook.com
#Creation time:                2022-10-18
#FileName:                     temp.sh
#Blog address:                 https://www.cnblogs.com/98record/
#Copyright (C)                  2022All rights reserved
#- - - - - - - - - - - - - end - - - - - - - - - - - - - - - - - -
clear
RED='\033[0;31m'
GRN='\033[0;32m'
YELLOW="\033[0;33m"
BLU='\033[0;34m'
LIGHT_GRAY="\033[0;37m"
LIGHT_GREEN="\033[1;32m"
NC='\033[0m'
# 密码加密密钥
key="6d6163776b2e636f6d2d6d6163776b2d636f6d2f6dd163776b21136f12"
iv="3534363122333334"
# 定义一个初始目录路径
###=================================
### 获取当前目录
###=================================
parentPath=$(
    cd "$(dirname "$0")"
    pwd -P
)
### 进入当前目录
cd "$(dirname "$0")"
echo
# 驱动安装程序路径
driverInstall=$( find "$parentPath" -name '*.pkg' -maxdepth 1)
# 本机驱动程序包地址,这是苹果打印机固定地址
driverPath_init="/Library/Printers/PPDs/Contents/Resources/"
# 获取任何来源状态
spctlStatus=$(spctl --status 2>/dev/null)
# 打印机信息路径
infoPath=$( find "$parentPath" -name 'Print' -maxdepth 1)
infoContent=$(awk -F ',' 'NR!=1 { print }' "$infoPath")
# 判断是不是m1型号
cpuinfo=$(sysctl -n machdep.cpu.brand_string)
rosetta_Path="/Library/Apple/usr/share/rosetta/rosetta"
# ini 配置文件目录
iniTmpDir=/tmp/apperk-config/
iniTmpFile=apperk-config.ini
echo -e "${LIGHT_GREEN}>${NC}『xxx打印机』自动安装器"
echo -e "${BLU}如安装有问题请截图联系IT-help处理${NC}"
# Start 关闭 Terminal 窗口
function closeTerminal() {
    if [ "${1}" ]; then
        delayValue="${1}"
    else
        delayValue=1
    fi

    if [ "$TERM_PROGRAM" == "Apple_Terminal" ]; then
        osascript -e 'delay '"${delayValue}"
        osascript -e 'tell application "Terminal" to close first window' &
        exit
    else
        osascript -e 'delay '"${delayValue}"
        exit
    fi
}
# End 关闭 Terminal 窗口
# Start 读取写入 ini 配置文件
function readIni() {
    file="${1}"
    section="${2}"
    item="${3}"
    val=$(awk -F '=' '/\['${section}'\]/{a=1} (a==1 && "'${item}'"==$1){a=0;print $2}' ${file})
    password=$(echo "${val}" | sed 's/^"//' | sed 's/"$//')
    password_pre="${password:0:7}"
    if [ "${password_pre}" == "apperk-" ]; then
        decrypt_str=$(echo "${password:7}==" | openssl enc -e -aes-256-cbc -a -K ${key} -iv ${iv} -nosalt -d 2>/dev/null)
        echo ""${decrypt_str}""
    else
        echo "${password}"
    fi
}
function writeIni() {
    file="${1}"
    section="${2}"
    item="${3}"
    val="${4}"
    if [ "${item}" == "PASS" ]; then
        encrypt_str="apperk-$(echo "${val}" | openssl enc -e -aes-256-cbc -a -K ${key} -iv ${iv} -nosalt 2>/dev/null)"
    else
        encrypt_str="${val}"
    fi
    awk -F '=' '/\['${section}'\]/{a=1} (a==1 && "'${item}'"==$1){gsub($2,"\"'"${encrypt_str}"'\"");a=0} {print $0}' ${file} 1<>${file}
}
# End 读取写入 ini 配置文件
# Start 判断是否开启了事件
function testSystemEvents() {
    /usr/bin/osascript <<EOT
tell application "System Events"
    try
        do shell script "cd ./"
        return 1
    on error errorMessage number errorNumber
        return errorNumber
    end try
end tell
EOT
}
# End 判断是否开启了事件

# Start 密码输入窗口
function authPassword() {
    local authPass="${1}"
    /usr/bin/osascript <<EOT
on getAuthPass()
tell application "System Events"
    activate
    repeat
        with timeout of 86400 seconds
        display dialog "请输入您的电脑开机密码或锁屏密码后点击继续:" ¬
                        default answer "" ¬
                        with title "xxx打印机安装" ¬
                        with hidden answer ¬
                        buttons {"退出", "继续"} default button 2
    if button returned of the result is "退出" then
        return "exitapperk"
            exit repeat
    else if the button returned of the result is "继续" then
    set pswd to text returned of the result
            set usr to short user name of (system info)
    try
    do shell script "echo test" user name usr password pswd with administrator privileges
                do shell script "$(makeIniDir)"
    return pswd
                exit repeat
    end try
    end if
        end timeout

    end repeat
end tell
end getAuthPass

tell application "System Events"
    activate
        set pswd to text of the "${authPass}"
        set usr to short user name of (system info)
try
            do shell script "echo test" user name usr password pswd with administrator privileges
            return pswd
        on error
            my getAuthPass()
        end try
end tell
EOT
}

function setSudo() {
    authPass=$(authPassword "${1}")
    # 如果点击退出按钮,则中止
    if [ "$authPass" == "exitapperk" ]; then
        echo -e "${YELLOW}您未输入密码,正在为您取消本次安装。${NC}"
        closeTerminal
    else

        if [ -z "${authPass}" ]; then
            echo -e "\n\n"
            echo -e "${RED}无法读取您输入的密码,请在下方钥匙图标后输入您的电脑密码。${NC}(密码输入的过程中是看不到的,输入完成按下回车键)"
            echo
            read -s authPass
        fi

        local currentDate=$(date +%s)
        # 将密码写书入 ini 文件
        local writeinipass=$(writeIni $iniTmpDir/$iniTmpFile SYSTEM PASS "${authPass}" 2>/dev/null)
        local writeinidate=$(writeIni $iniTmpDir/$iniTmpFile SYSTEM DATE ${currentDate} 2>/dev/null)

        # 代替sudo命令的函数
        sudo() {
            /bin/echo "${authPass}" | /usr/bin/sudo -S "$@"
        }
        sudo -- sh -c "chmod 777 $iniTmpDir/$iniTmpFile" &>/dev/null
        sudo -- sh -c "chmod 777 $iniTmpDir/*" &>/dev/null
    fi
}
# End 密码输入窗口

# Start 创建配置目录
function makeIniDir() {
    # 将 ini 配置文件复制到 临时文件/tmp 目录
    rm -rf "${iniTmpDir}" &>/dev/null
    mkdir -p "${iniTmpDir}" &>/dev/null
    cp -a "${parentPath}/${iniTmpFile}" "${iniTmpDir}" &>/dev/null
}
# End 创建配置目录
function countDown() {
    secs=$1
    shift
    while [ $secs -gt 0 ]; do
        printf "\r本窗口 %.d 秒后自动关闭" $((secs--))
        sleep 1
    done
}
if [ $(testSystemEvents) == '-1743' ]; then
    echo -e "${YELLOW}您未授权自动化请求!${NC}请前往${CYAN}「系统偏好设置 -> 安全性与隐私 -> 隐私 -> 自动化」${NC}中${GREEN}勾选「终端」${NC}项下面的${GREEN}「System Events」${NC},然后重新安装。"
    echo
    countDown 20
    echo
    closeTerminal
fi
if [ -f "${iniTmpDir}/${iniTmpFile}" ]; then
    # 读取 ini 配置文件中的密码
    iniPass="$(readIni ${iniTmpDir}/${iniTmpFile} SYSTEM PASS)"
    iniDate="$(readIni ${iniTmpDir}/${iniTmpFile} SYSTEM DATE)"
    currentDate=$(date +%s)
    if [[ "${iniPass}" ]] && [[ "${iniDate}" ]]; then
        #超过6个小时重新获取密码
        if [ $(($currentDate - $iniDate)) -gt 21600 ]; then
            makeIniDir
            # 获取密码
            setSudo
        else
            # 传递密码
            setSudo "${iniPass}"
        fi
    else
        makeIniDir
        # 获取密码
        setSudo
    fi
else
    makeIniDir
    # 获取密码
    setSudo

fi
# Start 判断 AppleScript 授权状态

# End 判断 AppleScript 授权状态
# End 判断是否存在配置文件
if [[ ${spctlStatus} == *"enabled"* ]]; then
     echo -e "${LIGHT_GRAY}您系统当前不允许运行非 App Store 安装的软件,${NC}正在为您开启任何来源"
     sudo -- sh -c "spctl --master-disable &>/dev/null"
fi
if [[ "$cpuinfo" == Apple*  ]] ;then
      n=0
      while (($n < 10000000)); do
          n=$((n + 1))
          echo -e "正在检测Rosetta工具是否已安装,第${n}次……"
          if [ ! -e "$rosetta_Path" ]; then
              echo
              echo -e "${LIGHT_GRAY}检测到未安装Rosetta工具,正在进行安装………${NC}"
              /usr/sbin/softwareupdate --install-rosetta --agree-to-license && \
              break
          else
            echo -e "${LIGHT_GRAY}检测到已经安装Rosetta工具,接下来检测是否接入内网.${NC}"
            break
          fi
      #     break
      done
fi
# 查询是否连接公司无线,如果不是则提醒用户连接Wi-Fi
current_wifi=$(/System/Library/PrivateFrameworks/Apple80211.framework/Versions/Current/Resources/AIrport -I | \
awk '/ SSID/ {print substr($0, index($0, $2))}')
# echo -e "${LIGHT_GRAY}正在查询你的网络状态,是否接入内网.${NC}" && \
if [[ "$current_wifi" == *temp  ]] || [[ "$current_wifi" == *Inc  ]] ;then
      sudo -- sh -c "installer -pkg $driverInstall -target /" && \
      #如果是其他型号的话则替换name即可
      driverPath=$(find $driverPath_init -name '*36C-9*' -maxdepth 1)
      # 循环读取 Print中的内容并且安装打印机
      for line in $infoContent;do
            name=$(echo "$line" | awk -F ',' '{ print $1}')
            ip=$(echo "$line" | awk -F ',' '{ print $2}')
            decide=$(echo "$line" | awk -F ',' '{ print $3}')
            # 生成该打印机的时候CUPS用来作为该打印机的文件名
            printername="$name"
            # 打印机的物理位置,比如说财务办公室,前台打印机等等,这个信息是可选的
            # location="$name"
            # 在GUI中显示的打印机名称
            gui_display_name="$name"
            # 打印机地址
            address="Socket://$ip"
            # 如果是禁用状态,并且电脑存在此打印机名的则删除,否则安装
            if [[ "$decide" == N ]] && lpstat -p "$name" -l > /dev/null 2>&1;then
                  lpadmin -x "$name" > /dev/null 2>&1
            elif [[ "$decide" == Y ]];then
                  # echo $driverPath
                  # 添加打印机
                  # echo "不存在并且启用打印机: $name"
                  /usr/sbin/lpadmin \
                    -p "${printername}" \
                    -D "${gui_display_name}" \
                    -v "${address}" \
                    -P "${driverPath}" \
                    -o printer-is-shared=false \
                    -E > /dev/null 2>&1
            fi
      done
      if [ $? -eq 0 ];then
                echo -e "${RED}打印机名带彩色字样的则支持彩色打印,黑白字样则不支持彩色打印${NC}\n${GRN}安装完成,正在关闭本窗口……${NC}\n"
                hdiutil detach -force "${parentPath}" &>/dev/null
                sleep 4 && \
            #     osascript -e "do Shell script \"osascript -e \\\"tell application \\\\\\\"Terminal\\\\\\\" to quit\\\" &> /dev/null &\""; exit
                closeTerminal
      else
                echo "${RED}安装失败请截图联系it-help${NC}"
      fi
else
        # 使用Mac 弹窗告警功能,提示员工需要连接公司内网Wi-Fi
        osascript -e 'tell application (path to frontmost application as text) to display dialog "请使用temp或Inc后缀 Wi-Fi 后重新运行此安装脚本" buttons {"OK"} with icon stop' && \
      #   osascript -e "do Shell script \"osascript -e \\\"tell application \\\\\\\"Terminal\\\\\\\" to quit\\\" &> /dev/null &\""; exit
        hdiutil detach -force "${parentPath}" &>/dev/null && \
        closeTerminal
fi
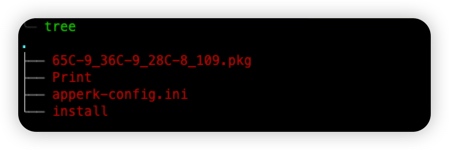
注意事项‼️
- 操作完后文件夹中应该是下面图片这个样子(pkg文件就是打印机驱动)
- 我的代码中写了检测WiFi的,如果你们不需要就直接删了就行,需要的话则改成你们自己的WiFi名称。
- 别的好像也没有什么要注意的了,有问题再说
