
集群基础设置
配置清单
OS: ubuntu 22.04
kubernetes: 1.28.3
Container Runtime:Docker CE 24.0.7
CRI: cri-docker v0.3.7
集群规划
服务器IP |
主机名 |
配置 |
192.168.174.100 |
k8s-master-01 |
16C 16G 200G |
192.168.174.101 |
k8s-master-02 |
|
192.168.174.102 |
k8s-master-03 |
|
192.168.174.106 |
k8s-node-01 |
48C 256G 2T/ssd |
192.168.174.107 |
k8s-node-02 |
|
192.168.174.108 |
k8s-node-03 |
|
网络规划
pod网络:10.200.0.0/16
service网络: 10.100.0.0/16
节点网络:192.168.174.0/24
时间同步
apt -y install chronysystemctl enable chrony && systemctl start chronychronyc sources -v免密登录
# apt -y install sshpass
# ssh-keygen
# sshpass ssh-copy-id 192.168.174.100 -o StrictHostKeyChecking=no
# sshpass ssh-copy-id 192.168.174.106 -o StrictHostKeyChecking=no
# sshpass ssh-copy-id 192.168.174.107 -o StrictHostKeyChecking=no
# sshpass ssh-copy-id 192.168.174.108 -o StrictHostKeyChecking=no设置主机名
hostnamectl set-hostname k8s-master-01设置 hosts
cat >> /etc/hosts << EOF
192.168.174.100 k8s-master-01
192.168.174.106 k8s-node-01
192.168.174.107 k8s-node-02
192.168.174.108 k8s-node-03
EOF
禁用 swap
sudo swapoff -a && sed -i '/swap/s/^/#/' /etc/fstabor
systemctl disable --now swap.img.swap
systemctl mask swap.target
禁用防火墙
ufw disableufw status内核参数调整
cat <<EOF | sudo tee /etc/modules-load.d/k8s.conf
overlay
br_netfilter
EOF
sudo modprobe overlay
sudo modprobe br_netfilter设置所需的 sysctl 参数,参数在重新启动后保持不变
cat <<EOF | sudo tee /etc/sysctl.d/k8s.conf
net.bridge.bridge-nf-call-iptables  = 1
net.bridge.bridge-nf-call-ip6tables = 1
net.ipv4.ip_forward                 = 1
EOF
应用 sysctl 参数而不重新启动
sudo sysctl --system通过运行以下指令确认 br_netfilter 和 overlay 模块被加载
lsmod | grep br_netfilter
lsmod | grep overlay
通过运行以下指令确认 net.bridge.bridge-nf-call-iptables、net.bridge.bridge-nf-call-ip6tables 和 net.ipv4.ip_forward 系统变量在你的 sysctl 配置中被设置为 1
sysctl net.bridge.bridge-nf-call-iptables net.bridge.bridge-nf-call-ip6tables net.ipv4.ip_forwardnet.bridge.bridge-nf-call-iptables = 1
net.bridge.bridge-nf-call-ip6tables = 1
net.ipv4.ip_forward = 1开启 ipvs
安装 ipvs
apt install -y ipset ipvsadm内核加载 ipvs
cat <<EOF | sudo tee /etc/modules-load.d/ipvs.conf
ip_vs
ip_vs_rr
ip_vs_wrr
ip_vs_sh
nf_conntrack
EOF
sudo modprobe ip_vs
sudo modprobe ip_vs_rr
sudo modprobe ip_vs_wrr
sudo modprobe ip_vs_sh
sudo modprobe nf_conntrack确认ipvs模块加载
lsmod |grep -e ip_vs -e nf_conntracknf_conntrack_netlink 57344 0
nfnetlink 20480 4 nft_compat,nf_conntrack_netlink,nf_tables
ip_vs_sh 12288 0
ip_vs_wrr 12288 0
ip_vs_rr 12288 0
ip_vs 221184 6 ip_vs_rr,ip_vs_sh,ip_vs_wrr
nf_conntrack 200704 5 xt_conntrack,nf_nat,nf_conntrack_netlink,xt_MASQUERADE,ip_vs
nf_defrag_ipv6 24576 2 nf_conntrack,ip_vs
nf_defrag_ipv4 12288 1 nf_conntrack
libcrc32c 12288 6 nf_conntrack,nf_nat,btrfs,nf_tables,raid456,ip_vs开放端口
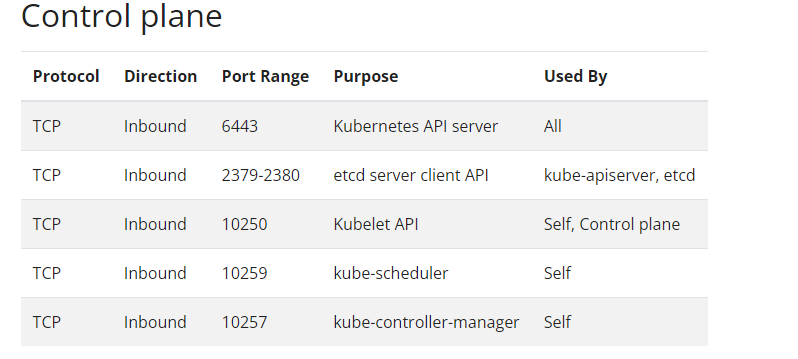

kubernetes集群部署前提
安装 Docker CE 24.0.7
安装 cri-docker v0.3.7
安装 kubeadm、kubelet 和 kubectl
安装依赖
sudo apt-get update && sudo apt-get install -y apt-transport-https ca-certificates curl gpg添加kubernetes的key
curl -fsSL https://repo.huaweicloud.com/kubernetes/apt/doc/apt-key.gpg | sudo gpg --dearmor -o /etc/apt/keyrings/kubernetes-apt-keyring.gpgor
curl -fsSL https://pkgs.k8s.io/core:/stable:/v1.28/deb/Release.key | sudo gpg --dearmor -o /etc/apt/keyrings/kubernetes-apt-keyring.gpg添加kubernetes的仓库
echo 'deb [signed-by=/etc/apt/keyrings/kubernetes-apt-keyring.gpg] https://repo.huaweicloud.com/kubernetes/apt/ kubernetes-xenial main' | sudo tee /etc/apt/sources.list.d/kubernetes.listor
echo 'deb [signed-by=/etc/apt/keyrings/kubernetes-apt-keyring.gpg] https://pkgs.k8s.io/core:/stable:/v1.28/deb/ /' | sudo tee /etc/apt/sources.list.d/kubernetes.list更新 apt 索引
sudo apt update查看 kubelet、kubeadm 和 kubectl版本
apt-cache madison kubeadmkubeadm | 1.28.3-1.1 | https://pkgs.k8s.io/core:/stable:/v1.28/deb Packages
kubeadm | 1.28.2-1.1 | https://pkgs.k8s.io/core:/stable:/v1.28/deb Packages
kubeadm | 1.28.1-1.1 | https://pkgs.k8s.io/core:/stable:/v1.28/deb Packages
kubeadm | 1.28.0-1.1 | https://pkgs.k8s.io/core:/stable:/v1.28/deb Packages安装 kubelet、kubeadm 和 kubectl
sudo apt-get install -y kubelet kubeadm kubectl确认 kubectl 版本信息
kubectl versionClient Version: v1.28.3
Kustomize Version: v5.0.4-0.20230601165947-6ce0bf390ce3锁定版本
sudo apt-mark hold kubelet kubeadm kubectl运行服务
systemctl enable kubelet.servicekubectl 命令补全
apt install -y bash-completionkubectl completion bash > /etc/profile.d/kubectl_completion.sh. /etc/profile.d/kubectl_completion.sh准备镜像
查看镜像版本
root@k8s-master-01:~# kubeadm config images listregistry.k8s.io/kube-apiserver:v1.28.3
registry.k8s.io/kube-controller-manager:v1.28.3
registry.k8s.io/kube-scheduler:v1.28.3
registry.k8s.io/kube-proxy:v1.28.3
registry.k8s.io/pause:3.9
registry.k8s.io/etcd:3.5.9-0
registry.k8s.io/coredns/coredns:v1.10.1查看阿里云镜像
root@k8s-master-01:~# kubeadm config images list --image-repository registry.aliyuncs.com/google_containersregistry.aliyuncs.com/google_containers/kube-apiserver:v1.28.3
registry.aliyuncs.com/google_containers/kube-controller-manager:v1.28.3
registry.aliyuncs.com/google_containers/kube-scheduler:v1.28.3
registry.aliyuncs.com/google_containers/kube-proxy:v1.28.3
registry.aliyuncs.com/google_containers/pause:3.9
registry.aliyuncs.com/google_containers/etcd:3.5.9-0
registry.aliyuncs.com/google_containers/coredns:v1.10.1下载阿里云镜像
所有节点执行下载操作,也可导出导入操作。docker image save `docker image ls --format "{{.Repository}}:{{.Tag}}"` -o k8s-images-v1.28.3.tarkubeadm config images pull --kubernetes-version=v1.28.3 --image-repository registry.aliyuncs.com/google_containers --cri-socket unix:///run/cri-dockerd.sock[config/images] Pulled registry.aliyuncs.com/google_containers/kube-apiserver:v1.28.3
[config/images] Pulled registry.aliyuncs.com/google_containers/kube-controller-manager:v1.28.3
[config/images] Pulled registry.aliyuncs.com/google_containers/kube-scheduler:v1.28.3
[config/images] Pulled registry.aliyuncs.com/google_containers/kube-proxy:v1.28.3
[config/images] Pulled registry.aliyuncs.com/google_containers/pause:3.9
[config/images] Pulled registry.aliyuncs.com/google_containers/etcd:3.5.9-0
[config/images] Pulled registry.aliyuncs.com/google_containers/coredns:v1.10.1生成kubeadm init的配置文件
kubeadm-init-demo.yaml
apiVersion: kubeadm.k8s.io/v1beta3
bootstrapTokens:
- groups:
  - system:bootstrappers:kubeadm:default-node-token
  token: wgs001.com3yjucgqr276rf # 可以自定义,正则([a-z0-9]{6}).([a-z0-9]{16})
  ttl: 24h0m0s
  usages:
  - signing
  - authentication
kind: InitConfiguration
localAPIEndpoint:
  advertiseAddress: ${K8S_API_ADDVERTISE_IP} # 修改成节点ip
  bindPort: 6443
nodeRegistration:
  criSocket: unix:///var/run/cri-dockerd.sock
  imagePullPolicy: IfNotPresent
  name: k8s-master-01 # 节点的hostname
  taints:
  - effect: NoSchedule
    key: node-role.kubernetes.io/master
  - effect: NoSchedule
    key: node-role.kubernetes.io/control-plane
---
apiServer:
  timeoutForControlPlane: 4m0s
  certSANs: # 主节点IP
  - ${K8S_API_ENDPOINT}
  - ${K8S_API_ADDVERTISE_IP}
apiVersion: kubeadm.k8s.io/v1beta3
controlPlaneEndpoint: "${K8S_API_ENDPOINT}:6443" # 设置高可用地址
certificatesDir: /etc/kubernetes/pki
clusterName: ${K8S_CLUSTER_NAME}
controllerManager: {}
dns: {}
etcd:
  local:
    dataDir: /var/lib/etcd
imageRepository: registry.aliyuncs.com/google_containers # 国内源
kind: ClusterConfiguration
kubernetesVersion: v${K8S_VERSION} # 指定版本
networking:
  dnsDomain: ${K8S_DNS_DOMAIN}
  podSubnet: ${K8S_POD_SUBNET} # 增加指定pod的网段
  serviceSubnet: ${K8S_SERVICE_SUBNET}
scheduler: {}
---
# 用于配置kube-proxy上为Service指定的代理模式: ipvs or iptables
apiVersion: kubeproxy.config.k8s.io/v1alpha1
kind: KubeProxyConfiguration
mode: "${K8S_SERVICE_MODE}"
---
# 指定cgroup
apiVersion: kubelet.config.k8s.io/v1beta1
kind: KubeletConfiguration
cgroupDriver: "${K8S_CGROUP_DRIVER}"
generate-init-config.sh
#!/bin/bash
# export addresses and other vars
set -a
K8S_API_ENDPOINT=192.168.174.100        # 高可用地址
K8S_API_ADDVERTISE_IP=192.168.174.100   # 节点ip
K8S_VERSION=1.28.3
K8S_CLUSTER_NAME=kubernetes
K8S_SERVICE_MODE=ipvs
K8S_POD_SUBNET="10.200.0.0/16"
K8S_SERVICE_SUBNET="10.100.0.0/16"
K8S_DNS_DOMAIN="wgs.local"
K8S_CGROUP_DRIVER="systemd"
set +a

envsubst < kubeadm-init-demo.yaml > kubeadm-init-config.yaml
生成配置文件
bash generate-init-config.sh初始化 Kubernetes 集群
初始化 k8s-master-01节点
root@k8s-master-01:~# kubeadm init --config ./kubeadm-init-config.yaml --upload-certs[init] Using Kubernetes version: v1.28.3
[preflight] Running pre-flight checks
[preflight] Pulling images required for setting up a Kubernetes cluster
[preflight] This might take a minute or two, depending on the speed of your internet connection
[preflight] You can also perform this action in beforehand using 'kubeadm config images pull'
[certs] Using certificateDir folder "/etc/kubernetes/pki"
[certs] Generating "ca" certificate and key
[certs] Generating "apiserver" certificate and key
[certs] apiserver serving cert is signed for DNS names [k8s-master-01 kubernetes kubernetes.default kubernetes.default.svc kubernetes.default.svc.wgs.local] and IPs [10.100.0.1 192.168.174.100]
[certs] Generating "apiserver-kubelet-client" certificate and key
[certs] Generating "front-proxy-ca" certificate and key
[certs] Generating "front-proxy-client" certificate and key
[certs] Generating "etcd/ca" certificate and key
[certs] Generating "etcd/server" certificate and key
[certs] etcd/server serving cert is signed for DNS names [k8s-master-01 localhost] and IPs [192.168.174.100 127.0.0.1 ::1]
[certs] Generating "etcd/peer" certificate and key
[certs] etcd/peer serving cert is signed for DNS names [k8s-master-01 localhost] and IPs [192.168.174.100 127.0.0.1 ::1]
[certs] Generating "etcd/healthcheck-client" certificate and key
[certs] Generating "apiserver-etcd-client" certificate and key
[certs] Generating "sa" key and public key
[kubeconfig] Using kubeconfig folder "/etc/kubernetes"
[kubeconfig] Writing "admin.conf" kubeconfig file
[kubeconfig] Writing "kubelet.conf" kubeconfig file
[kubeconfig] Writing "controller-manager.conf" kubeconfig file
[kubeconfig] Writing "scheduler.conf" kubeconfig file
[etcd] Creating static Pod manifest for local etcd in "/etc/kubernetes/manifests"
[control-plane] Using manifest folder "/etc/kubernetes/manifests"
[control-plane] Creating static Pod manifest for "kube-apiserver"
[control-plane] Creating static Pod manifest for "kube-controller-manager"
[control-plane] Creating static Pod manifest for "kube-scheduler"
[kubelet-start] Writing kubelet environment file with flags to file "/var/lib/kubelet/kubeadm-flags.env"
[kubelet-start] Writing kubelet configuration to file "/var/lib/kubelet/config.yaml"
[kubelet-start] Starting the kubelet
[wait-control-plane] Waiting for the kubelet to boot up the control plane as static Pods from directory "/etc/kubernetes/manifests". This can take up to 4m0s
[apiclient] All control plane components are healthy after 5.002373 seconds
[upload-config] Storing the configuration used in ConfigMap "kubeadm-config" in the "kube-system" Namespace
[kubelet] Creating a ConfigMap "kubelet-config" in namespace kube-system with the configuration for the kubelets in the cluster
[upload-certs] Storing the certificates in Secret "kubeadm-certs" in the "kube-system" Namespace
[upload-certs] Using certificate key:
2bfcd8f51cc467bd8954d78e525eb9750861dda4a054b8761376ffdb782df62a
[mark-control-plane] Marking the node k8s-master-01 as control-plane by adding the labels: [node-role.kubernetes.io/control-plane node.kubernetes.io/exclude-from-external-load-balancers]
[mark-control-plane] Marking the node k8s-master-01 as control-plane by adding the taints [node-role.kubernetes.io/master:NoSchedule node-role.kubernetes.io/control-plane:NoSchedule]
[bootstrap-token] Using token: wgs001.com3yjucgqr276rf
[bootstrap-token] Configuring bootstrap tokens, cluster-info ConfigMap, RBAC Roles
[bootstrap-token] Configured RBAC rules to allow Node Bootstrap tokens to get nodes
[bootstrap-token] Configured RBAC rules to allow Node Bootstrap tokens to post CSRs in order for nodes to get long term certificate credentials
[bootstrap-token] Configured RBAC rules to allow the csrapprover controller automatically approve CSRs from a Node Bootstrap Token
[bootstrap-token] Configured RBAC rules to allow certificate rotation for all node client certificates in the cluster
[bootstrap-token] Creating the "cluster-info" ConfigMap in the "kube-public" namespace
[kubelet-finalize] Updating "/etc/kubernetes/kubelet.conf" to point to a rotatable kubelet client certificate and key
[addons] Applied essential addon: CoreDNS
[addons] Applied essential addon: kube-proxy
Your Kubernetes control-plane has initialized successfully!
To start using your cluster, you need to run the following as a regular user:
mkdir -p $HOME/.kube
sudo cp -i /etc/kubernetes/admin.conf $HOME/.kube/config
sudo chown $(id -u):$(id -g) $HOME/.kube/config
Alternatively, if you are the root user, you can run:
export KUBECONFIG=/etc/kubernetes/admin.conf
You should now deploy a pod network to the cluster.
Run "kubectl apply -f [podnetwork].yaml" with one of the options listed at:
https://kubernetes.io/docs/concepts/cluster-administration/addons/
You can now join any number of the control-plane node running the following command on each as root:
kubeadm join 192.168.174.100:6443 --token wgs001.com3yjucgqr276rf \
--discovery-token-ca-cert-hash sha256:16705f55d705c4b6ea753fcdf5aeb50dfea1b67514510cdc78f4cbe7f6cac996 \
--control-plane --certificate-key 2bfcd8f51cc467bd8954d78e525eb9750861dda4a054b8761376ffdb782df62a
Please note that the certificate-key gives access to cluster sensitive data, keep it secret!
As a safeguard, uploaded-certs will be deleted in two hours; If necessary, you can use
"kubeadm init phase upload-certs --upload-certs" to reload certs afterward.
Then you can join any number of worker nodes by running the following on each as root:
kubeadm join 192.168.174.100:6443 --token wgs001.com3yjucgqr276rf \
--discovery-token-ca-cert-hash sha256:16705f55d705c4b6ea753fcdf5aeb50dfea1b67514510cdc78f4cbe7f6cac996k8s-master-01节点生成 kubectl 命令的授权文件
root@k8s-master-01:~# mkdir -p $HOME/.kube
root@k8s-master-01:~# sudo cp -i /etc/kubernetes/admin.conf $HOME/.kube/config
root@k8s-master-01:~# sudo chown $(id -u):$(id -g) $HOME/.kube/config
查看节点状态
root@k8s-master-01:~# kubectl get nodeNAME STATUS ROLES AGE VERSION
k8s-master-01 NotReady control-plane 10m v1.28.3安装calico网络组件
下载 tigera-operator
wget https://raw.githubusercontent.com/projectcalico/calico/v3.26.3/manifests/tigera-operator.yaml下载 custom-resources
wget https://raw.githubusercontent.com/projectcalico/calico/v3.26.3/manifests/custom-resources.yaml修改 custom-resources.yaml
# This section includes base Calico installation configuration.
# For more information, see: https://projectcalico.docs.tigera.io/master/reference/installation/api#operator.tigera.io/v1.Installation
apiVersion: operator.tigera.io/v1
kind: Installation
metadata:
  name: default
spec:
  # Configures Calico networking.
  calicoNetwork:
    # Note: The ipPools section cannot be modified post-install.
    ipPools:
    - blockSize: 26
      cidr: 10.200.0.0/16    # 和 --pod-network-cidr  保持一致
      encapsulation: VXLANCrossSubnet  # VXLAN 跨子网模式
      natOutgoing: Enabled
      nodeSelector: all()
  #registry: myregistry.com     # 定义hub地址
---

# This section configures the Calico API server.
# For more information, see: https://projectcalico.docs.tigera.io/master/reference/installation/api#operator.tigera.io/v1.APIServer
apiVersion: operator.tigera.io/v1
kind: APIServer
metadata:
  name: default
spec: {}
创建 tigera-operator 资源
kubectl create -f tigera-operator.yamlnamespace/tigera-operator created
customresourcedefinition.apiextensions.k8s.io/bgpconfigurations.crd.projectcalico.org created
customresourcedefinition.apiextensions.k8s.io/bgpfilters.crd.projectcalico.org created
customresourcedefinition.apiextensions.k8s.io/bgppeers.crd.projectcalico.org created
customresourcedefinition.apiextensions.k8s.io/blockaffinities.crd.projectcalico.org created
customresourcedefinition.apiextensions.k8s.io/caliconodestatuses.crd.projectcalico.org created
customresourcedefinition.apiextensions.k8s.io/clusterinformations.crd.projectcalico.org created
customresourcedefinition.apiextensions.k8s.io/felixconfigurations.crd.projectcalico.org created
customresourcedefinition.apiextensions.k8s.io/globalnetworkpolicies.crd.projectcalico.org created
customresourcedefinition.apiextensions.k8s.io/globalnetworksets.crd.projectcalico.org created
customresourcedefinition.apiextensions.k8s.io/hostendpoints.crd.projectcalico.org created
customresourcedefinition.apiextensions.k8s.io/ipamblocks.crd.projectcalico.org created
customresourcedefinition.apiextensions.k8s.io/ipamconfigs.crd.projectcalico.org created
customresourcedefinition.apiextensions.k8s.io/ipamhandles.crd.projectcalico.org created
customresourcedefinition.apiextensions.k8s.io/ippools.crd.projectcalico.org created
customresourcedefinition.apiextensions.k8s.io/ipreservations.crd.projectcalico.org created
customresourcedefinition.apiextensions.k8s.io/kubecontrollersconfigurations.crd.projectcalico.org created
customresourcedefinition.apiextensions.k8s.io/networkpolicies.crd.projectcalico.org created
customresourcedefinition.apiextensions.k8s.io/networksets.crd.projectcalico.org created
customresourcedefinition.apiextensions.k8s.io/apiservers.operator.tigera.io created
customresourcedefinition.apiextensions.k8s.io/imagesets.operator.tigera.io created
customresourcedefinition.apiextensions.k8s.io/installations.operator.tigera.io created
customresourcedefinition.apiextensions.k8s.io/tigerastatuses.operator.tigera.io created
serviceaccount/tigera-operator created
clusterrole.rbac.authorization.k8s.io/tigera-operator created
clusterrolebinding.rbac.authorization.k8s.io/tigera-operator created
deployment.apps/tigera-operator created创建 custom-resources
kubectl create -f custom-resources.yamlinstallation.operator.tigera.io/default created
apiserver.operator.tigera.io/default created查看 calico 资源
watch kubectl get pods -n calico-systemNAME READY STATUS RESTARTS AGE
calico-kube-controllers-7544756485-5lfzv 1/1 Running 0 20m
calico-node-q65zm 1/1 Running 0 20m
calico-typha-584d6cc45f-886hs 1/1 Running 0 20m
csi-node-driver-vcs57 2/2 Running 0 20m查看节点状态
kubectl get nodesNAME STATUS ROLES AGE VERSION
k8s-master-01 Ready control-plane 25m v1.28.3工作节点加入到kubernetes集群
k8s-node-01 节点
root@k8s-node-01:~# kubeadm join 192.168.174.100:6443 --token wgs001.com3yjucgqr276rf --discovery-token-ca-cert-hash sha256:16705f55d705c4b6ea753fcdf5aeb50dfea1b67514510cdc78f4cbe7f6cac996 --cri-socket unix:///run/cri-dockerd.sock[preflight] Running pre-flight checks
[preflight] Reading configuration from the cluster...
[preflight] FYI: You can look at this config file with 'kubectl -n kube-system get cm kubeadm-config -o yaml'
[kubelet-start] Writing kubelet configuration to file "/var/lib/kubelet/config.yaml"
[kubelet-start] Writing kubelet environment file with flags to file "/var/lib/kubelet/kubeadm-flags.env"
[kubelet-start] Starting the kubelet
[kubelet-start] Waiting for the kubelet to perform the TLS Bootstrap...
This node has joined the cluster:
* Certificate signing request was sent to apiserver and a response was received.
* The Kubelet was informed of the new secure connection details.
Run 'kubectl get nodes' on the control-plane to see this node join the cluster.k8s-node-02 节点
root@k8s-node-02:~# kubeadm join 192.168.174.100:6443 --token wgs001.com3yjucgqr276rf --discovery-token-ca-cert-hash sha256:16705f55d705c4b6ea753fcdf5aeb50dfea1b67514510cdc78f4cbe7f6cac996 --cri-socket unix:///run/cri-dockerd.sock[preflight] Running pre-flight checks
[preflight] Reading configuration from the cluster...
[preflight] FYI: You can look at this config file with 'kubectl -n kube-system get cm kubeadm-config -o yaml'
[kubelet-start] Writing kubelet configuration to file "/var/lib/kubelet/config.yaml"
[kubelet-start] Writing kubelet environment file with flags to file "/var/lib/kubelet/kubeadm-flags.env"
[kubelet-start] Starting the kubelet
[kubelet-start] Waiting for the kubelet to perform the TLS Bootstrap...
This node has joined the cluster:
* Certificate signing request was sent to apiserver and a response was received.
* The Kubelet was informed of the new secure connection details.
Run 'kubectl get nodes' on the control-plane to see this node join the cluster.k8s-node-03 节点
root@k8s-node-03:~# kubeadm join 192.168.174.100:6443 --token wgs001.com3yjucgqr276rf --discovery-token-ca-cert-hash sha256:16705f55d705c4b6ea753fcdf5aeb50dfea1b67514510cdc78f4cbe7f6cac996 --cri-socket unix:///run/cri-dockerd.sock[preflight] Running pre-flight checks
[preflight] Reading configuration from the cluster...
[preflight] FYI: You can look at this config file with 'kubectl -n kube-system get cm kubeadm-config -o yaml'
[kubelet-start] Writing kubelet configuration to file "/var/lib/kubelet/config.yaml"
[kubelet-start] Writing kubelet environment file with flags to file "/var/lib/kubelet/kubeadm-flags.env"
[kubelet-start] Starting the kubelet
[kubelet-start] Waiting for the kubelet to perform the TLS Bootstrap...
This node has joined the cluster:
* Certificate signing request was sent to apiserver and a response was received.
* The Kubelet was informed of the new secure connection details.
Run 'kubectl get nodes' on the control-plane to see this node join the cluster.查看节点状态
root@k8s-master-01:~# kubectl get nodeNAME STATUS ROLES AGE VERSION
k8s-master-01 Ready control-plane 35m v1.28.3
k8s-node-01 Ready <none> 7m52s v1.28.3
k8s-node-02 Ready <none> 7m28s v1.28.3
k8s-node-03 Ready <none> 7m25s v1.28.3添加master节点
k8s-master-02
root@k8s-master-02:~# kubeadm join 192.168.174.100:6443 --token wgs001.com3yjucgqr276rf --discovery-token-ca-cert-hash sha256:16705f55d705c4b6ea753fcdf5aeb50dfea1b67514510cdc78f4cbe7f6cac996 --control-plane --certificate-key 2bfcd8f51cc467bd8954d78e525eb9750861dda4a054b8761376ffdb782df62a --cri-socket unix:///run/cri-dockerd.sock[preflight] Running pre-flight checks
[preflight] Reading configuration from the cluster...
[preflight] FYI: You can look at this config file with 'kubectl -n kube-system get cm kubeadm-config -o yaml'
[preflight] Running pre-flight checks before initializing the new control plane instance
[preflight] Pulling images required for setting up a Kubernetes cluster
[preflight] This might take a minute or two, depending on the speed of your internet connection
[preflight] You can also perform this action in beforehand using 'kubeadm config images pull'
[download-certs] Downloading the certificates in Secret "kubeadm-certs" in the "kube-system" Namespace
[download-certs] Saving the certificates to the folder: "/etc/kubernetes/pki"
[certs] Using certificateDir folder "/etc/kubernetes/pki"
[certs] Generating "apiserver" certificate and key
[certs] apiserver serving cert is signed for DNS names [k8s-master-02 kubernetes kubernetes.default kubernetes.default.svc kubernetes.default.svc.wgs.local] and IPs [10.100.0.1 192.168.174.101 192.168.174.100]
[certs] Generating "apiserver-kubelet-client" certificate and key
[certs] Generating "front-proxy-client" certificate and key
[certs] Generating "etcd/peer" certificate and key
[certs] etcd/peer serving cert is signed for DNS names [k8s-master-02 localhost] and IPs [192.168.174.101 127.0.0.1 ::1]
[certs] Generating "etcd/server" certificate and key
[certs] etcd/server serving cert is signed for DNS names [k8s-master-02 localhost] and IPs [192.168.174.101 127.0.0.1 ::1]
[certs] Generating "etcd/healthcheck-client" certificate and key
[certs] Generating "apiserver-etcd-client" certificate and key
[certs] Valid certificates and keys now exist in "/etc/kubernetes/pki"
[certs] Using the existing "sa" key
[kubeconfig] Generating kubeconfig files
[kubeconfig] Using kubeconfig folder "/etc/kubernetes"
[kubeconfig] Writing "admin.conf" kubeconfig file
[kubeconfig] Writing "controller-manager.conf" kubeconfig file
[kubeconfig] Writing "scheduler.conf" kubeconfig file
[control-plane] Using manifest folder "/etc/kubernetes/manifests"
[control-plane] Creating static Pod manifest for "kube-apiserver"
[control-plane] Creating static Pod manifest for "kube-controller-manager"
[control-plane] Creating static Pod manifest for "kube-scheduler"
[check-etcd] Checking that the etcd cluster is healthy
[kubelet-start] Writing kubelet configuration to file "/var/lib/kubelet/config.yaml"
[kubelet-start] Writing kubelet environment file with flags to file "/var/lib/kubelet/kubeadm-flags.env"
[kubelet-start] Starting the kubelet
[kubelet-start] Waiting for the kubelet to perform the TLS Bootstrap...
[etcd] Announced new etcd member joining to the existing etcd cluster
[etcd] Creating static Pod manifest for "etcd"
[etcd] Waiting for the new etcd member to join the cluster. This can take up to 40s
The 'update-status' phase is deprecated and will be removed in a future release. Currently it performs no operation
[mark-control-plane] Marking the node k8s-master-02 as control-plane by adding the labels: [node-role.kubernetes.io/control-plane node.kubernetes.io/exclude-from-external-load-balancers]
[mark-control-plane] Marking the node k8s-master-02 as control-plane by adding the taints [node-role.kubernetes.io/control-plane:NoSchedule]
This node has joined the cluster and a new control plane instance was created:
* Certificate signing request was sent to apiserver and approval was received.
* The Kubelet was informed of the new secure connection details.
* Control plane label and taint were applied to the new node.
* The Kubernetes control plane instances scaled up.
* A new etcd member was added to the local/stacked etcd cluster.
To start administering your cluster from this node, you need to run the following as a regular user:
mkdir -p $HOME/.kube
sudo cp -i /etc/kubernetes/admin.conf $HOME/.kube/config
sudo chown $(id -u):$(id -g) $HOME/.kube/config
Run 'kubectl get nodes' to see this node join the cluster.k8s-master-03
root@k8s-master-03:~# kubeadm join 192.168.174.100:6443 --token wgs001.com3yjucgqr276rf --discovery-token-ca-cert-hash sha256:16705f55d705c4b6ea753fcdf5aeb50dfea1b67514510cdc78f4cbe7f6cac996 --control-plane --certificate-key 2bfcd8f51cc467bd8954d78e525eb9750861dda4a054b8761376ffdb782df62a --cri-socket unix:///run/cri-dockerd.sock[preflight] Running pre-flight checks
[preflight] Reading configuration from the cluster...
[preflight] FYI: You can look at this config file with 'kubectl -n kube-system get cm kubeadm-config -o yaml'
[preflight] Running pre-flight checks before initializing the new control plane instance
[preflight] Pulling images required for setting up a Kubernetes cluster
[preflight] This might take a minute or two, depending on the speed of your internet connection
[preflight] You can also perform this action in beforehand using 'kubeadm config images pull'
[download-certs] Downloading the certificates in Secret "kubeadm-certs" in the "kube-system" Namespace
[download-certs] Saving the certificates to the folder: "/etc/kubernetes/pki"
[certs] Using certificateDir folder "/etc/kubernetes/pki"
[certs] Generating "apiserver" certificate and key
[certs] apiserver serving cert is signed for DNS names [k8s-master-03 kubernetes kubernetes.default kubernetes.default.svc kubernetes.default.svc.wgs.local] and IPs [10.100.0.1 192.168.174.102 192.168.174.100]
[certs] Generating "apiserver-kubelet-client" certificate and key
[certs] Generating "front-proxy-client" certificate and key
[certs] Generating "apiserver-etcd-client" certificate and key
[certs] Generating "etcd/server" certificate and key
[certs] etcd/server serving cert is signed for DNS names [k8s-master-03 localhost] and IPs [192.168.174.102 127.0.0.1 ::1]
[certs] Generating "etcd/peer" certificate and key
[certs] etcd/peer serving cert is signed for DNS names [k8s-master-03 localhost] and IPs [192.168.174.102 127.0.0.1 ::1]
[certs] Generating "etcd/healthcheck-client" certificate and key
[certs] Valid certificates and keys now exist in "/etc/kubernetes/pki"
[certs] Using the existing "sa" key
[kubeconfig] Generating kubeconfig files
[kubeconfig] Using kubeconfig folder "/etc/kubernetes"
[kubeconfig] Writing "admin.conf" kubeconfig file
[kubeconfig] Writing "controller-manager.conf" kubeconfig file
[kubeconfig] Writing "scheduler.conf" kubeconfig file
[control-plane] Using manifest folder "/etc/kubernetes/manifests"
[control-plane] Creating static Pod manifest for "kube-apiserver"
[control-plane] Creating static Pod manifest for "kube-controller-manager"
[control-plane] Creating static Pod manifest for "kube-scheduler"
[check-etcd] Checking that the etcd cluster is healthy
[kubelet-start] Writing kubelet configuration to file "/var/lib/kubelet/config.yaml"
[kubelet-start] Writing kubelet environment file with flags to file "/var/lib/kubelet/kubeadm-flags.env"
[kubelet-start] Starting the kubelet
[kubelet-start] Waiting for the kubelet to perform the TLS Bootstrap...
[etcd] Announced new etcd member joining to the existing etcd cluster
[etcd] Creating static Pod manifest for "etcd"
[etcd] Waiting for the new etcd member to join the cluster. This can take up to 40s
The 'update-status' phase is deprecated and will be removed in a future release. Currently it performs no operation
[mark-control-plane] Marking the node k8s-master-03 as control-plane by adding the labels: [node-role.kubernetes.io/control-plane node.kubernetes.io/exclude-from-external-load-balancers]
[mark-control-plane] Marking the node k8s-master-03 as control-plane by adding the taints [node-role.kubernetes.io/control-plane:NoSchedule]
This node has joined the cluster and a new control plane instance was created:
* Certificate signing request was sent to apiserver and approval was received.
* The Kubelet was informed of the new secure connection details.
* Control plane label and taint were applied to the new node.
* The Kubernetes control plane instances scaled up.
* A new etcd member was added to the local/stacked etcd cluster.
To start administering your cluster from this node, you need to run the following as a regular user:
mkdir -p $HOME/.kube
sudo cp -i /etc/kubernetes/admin.conf $HOME/.kube/config
sudo chown $(id -u):$(id -g) $HOME/.kube/config
Run 'kubectl get nodes' to see this node join the cluster.查看集群状态
kubectl get nodesNAME STATUS ROLES AGE VERSION
k8s-master-01 Ready control-plane 57m v1.28.3
k8s-master-02 Ready control-plane 4m6s v1.28.3
k8s-master-03 Ready control-plane 3m42s v1.28.3
k8s-node-01 Ready <none> 29m v1.28.3
k8s-node-02 Ready <none> 29m v1.28.3
k8s-node-03 Ready <none> 28m v1.28.3设置 etcd 高可用
所有master节点etcd配置
grep "initial-cluster=" /etc/kubernetes/manifests/etcd.yaml- --initial-cluster=k8s-master-01=https://192.168.174.100:2380,k8s-master-03=https://192.168.174.102:2380,k8s-master-02=https://192.168.174.101:2380重启 kubelet 服务
systemctl restart kubelet查看集群资源信息
kubectl get pods -A -o wideNAMESPACE NAME READY STATUS RESTARTS AGE IP NODE NOMINATED NODE READINESS GATES
calico-apiserver calico-apiserver-7b96776775-4lb7t 1/1 Running 0 3h6m 10.200.151.131 k8s-master-01 <none> <none>
calico-apiserver calico-apiserver-7b96776775-jclh8 1/1 Running 0 3h6m 10.200.151.132 k8s-master-01 <none> <none>
calico-system calico-kube-controllers-7544756485-5lfzv 1/1 Running 0 3h19m 10.200.151.130 k8s-master-01 <none> <none>
calico-system calico-node-4hq99 1/1 Running 0 150m 192.168.174.101 k8s-master-02 <none> <none>
calico-system calico-node-dq4fs 1/1 Running 0 175m 192.168.174.106 k8s-node-01 <none> <none>
calico-system calico-node-f7wj8 1/1 Running 0 149m 192.168.174.102 k8s-master-03 <none> <none>
calico-system calico-node-jgxhk 1/1 Running 0 175m 192.168.174.107 k8s-node-02 <none> <none>
calico-system calico-node-q65zm 1/1 Running 0 3h19m 192.168.174.100 k8s-master-01 <none> <none>
calico-system calico-node-xh6vj 1/1 Running 0 175m 192.168.174.108 k8s-node-03 <none> <none>
calico-system calico-typha-584d6cc45f-886hs 1/1 Running 0 3h19m 192.168.174.100 k8s-master-01 <none> <none>
calico-system calico-typha-584d6cc45f-xcvfz 1/1 Running 0 150m 192.168.174.107 k8s-node-02 <none> <none>
calico-system calico-typha-584d6cc45f-xdf9x 1/1 Running 0 175m 192.168.174.106 k8s-node-01 <none> <none>
calico-system csi-node-driver-452px 2/2 Running 0 175m 10.200.89.129 k8s-node-03 <none> <none>
calico-system csi-node-driver-bnr6p 2/2 Running 0 175m 10.200.154.193 k8s-node-01 <none> <none>
calico-system csi-node-driver-cndqv 2/2 Running 0 149m 10.200.183.129 k8s-master-03 <none> <none>
calico-system csi-node-driver-qv6wn 2/2 Running 0 175m 10.200.44.193 k8s-node-02 <none> <none>
calico-system csi-node-driver-vcs57 2/2 Running 0 3h19m 10.200.151.129 k8s-master-01 <none> <none>
calico-system csi-node-driver-wfpvj 2/2 Running 0 150m 10.200.95.1 k8s-master-02 <none> <none>
kube-system coredns-66f779496c-59pg4 1/1 Running 0 3h23m 10.200.89.130 k8s-node-03 <none> <none>
kube-system coredns-66f779496c-fmtx6 1/1 Running 0 3h23m 10.200.89.131 k8s-node-03 <none> <none>
kube-system etcd-k8s-master-01 1/1 Running 0 3h23m 192.168.174.100 k8s-master-01 <none> <none>
kube-system etcd-k8s-master-02 1/1 Running 0 150m 192.168.174.101 k8s-master-02 <none> <none>
kube-system etcd-k8s-master-03 1/1 Running 0 149m 192.168.174.102 k8s-master-03 <none> <none>
kube-system kube-apiserver-k8s-master-01 1/1 Running 0 3h23m 192.168.174.100 k8s-master-01 <none> <none>
kube-system kube-apiserver-k8s-master-02 1/1 Running 0 150m 192.168.174.101 k8s-master-02 <none> <none>
kube-system kube-apiserver-k8s-master-03 1/1 Running 0 149m 192.168.174.102 k8s-master-03 <none> <none>
kube-system kube-controller-manager-k8s-master-01 1/1 Running 0 3h23m 192.168.174.100 k8s-master-01 <none> <none>
kube-system kube-controller-manager-k8s-master-02 1/1 Running 0 150m 192.168.174.101 k8s-master-02 <none> <none>
kube-system kube-controller-manager-k8s-master-03 1/1 Running 0 149m 192.168.174.102 k8s-master-03 <none> <none>
kube-system kube-proxy-4hr6x 1/1 Running 0 175m 192.168.174.107 k8s-node-02 <none> <none>
kube-system kube-proxy-9sc56 1/1 Running 0 150m 192.168.174.101 k8s-master-02 <none> <none>
kube-system kube-proxy-gwwjq 1/1 Running 0 175m 192.168.174.108 k8s-node-03 <none> <none>
kube-system kube-proxy-h488q 1/1 Running 0 175m 192.168.174.106 k8s-node-01 <none> <none>
kube-system kube-proxy-k2bm6 1/1 Running 0 3h23m 192.168.174.100 k8s-master-01 <none> <none>
kube-system kube-proxy-kttr7 1/1 Running 0 149m 192.168.174.102 k8s-master-03 <none> <none>
kube-system kube-scheduler-k8s-master-01 1/1 Running 0 3h23m 192.168.174.100 k8s-master-01 <none> <none>
kube-system kube-scheduler-k8s-master-02 1/1 Running 0 150m 192.168.174.101 k8s-master-02 <none> <none>
kube-system kube-scheduler-k8s-master-03 1/1 Running 0 149m 192.168.174.102 k8s-master-03 <none> <none>
tigera-operator tigera-operator-597bf4ddf6-qwdcc 1/1 Running 0 3h20m 192.168.174.100 k8s-master-01 <none> <none>集群网络测试
运行测试 pod
kubectl run client --image=ikubernetes/admin-box -it --rm --restart=Never --command -n default -- /bin/bashIf you don't see a command prompt, try pressing enter.
root@client /#测试外网
ping www.baidu.comPING www.baidu.com (110.242.68.4): 56 data bytes
64 bytes from 110.242.68.4: seq=0 ttl=127 time=11.135 ms
64 bytes from 110.242.68.4: seq=1 ttl=127 time=10.791 ms
^C
--- www.baidu.com ping statistics ---
2 packets transmitted, 2 packets received, 0% packet loss
round-trip min/avg/max = 10.791/10.963/11.135 ms查看 domain
cat /etc/resolv.confnameserver 10.100.0.10
search default.svc.wgs.local svc.wgs.local wgs.local
options ndots:5域名解析
nslookup www.baidu.comServer: 10.100.0.10
Address: 10.100.0.10#53
Non-authoritative answer:
www.baidu.com canonical name = www.a.shifen.com.
Name: www.a.shifen.com
Address: 110.242.68.4
Name: www.a.shifen.com
Address: 110.242.68.3
Name: www.a.shifen.com
Address: 2408:871a:2100:3:0:ff:b025:348d
Name: www.a.shifen.com
Address: 2408:871a:2100:2:0:ff:b09f:237内网测试
# ping 192.168.174.100
PING 192.168.174.100 (192.168.174.100): 56 data bytes
64 bytes from 192.168.174.100: seq=0 ttl=63 time=0.473 ms
64 bytes from 192.168.174.100: seq=1 ttl=63 time=0.357 ms
^C
# ping 10.200.95.1
PING 10.200.95.1 (10.200.95.1): 56 data bytes
64 bytes from 10.200.95.1: seq=0 ttl=62 time=0.528 ms
64 bytes from 10.200.95.1: seq=1 ttl=62 time=0.332 ms
^C
--- 10.200.95.1 ping statistics ---
2 packets transmitted, 2 packets received, 0% packet loss
round-trip min/avg/max = 0.332/0.430/0.528 ms# curl demoapp.default.svc.wgs.local
iKubernetes demoapp v1.0 !! ClientIP: 10.200.154.195, ServerName: demoapp-7c58cd6bb-6czkk, ServerIP: 10.200.44.195!删除集群节点
驱逐节点上的pod
kubectl drain k8s-node-03 --delete-emptydir-data --force --ignore-daemonsets重置节点
kubeadm reset -f --cri-socket unix:///run/cri-dockerd.sock删除节点
kubectl delete node k8s-node-03删除配置信息
rm -rf /etc/kubernetes/ /var/lib/kubelet /var/lib/dockershim /var/run/kubernetes /var/lib/cni /etc/cni/net.d /var/lib/etcd /run/flannel/ $HOME/.kube/configetcd 高可用模型
Stacked etcd
使用stacked控制平面节点,其中 etcd 节点与控制平面节点共存。这种拓扑将控制平面和 etcd 成员耦合在同一节点上。
优点:相对使用外部 etcd 集群, 设置起来更简单,而且更易于副本管理。
缺点:如果一个节点发生故障,则 etcd 成员和控制平面实例都将丢失, 并且冗余会受到影响。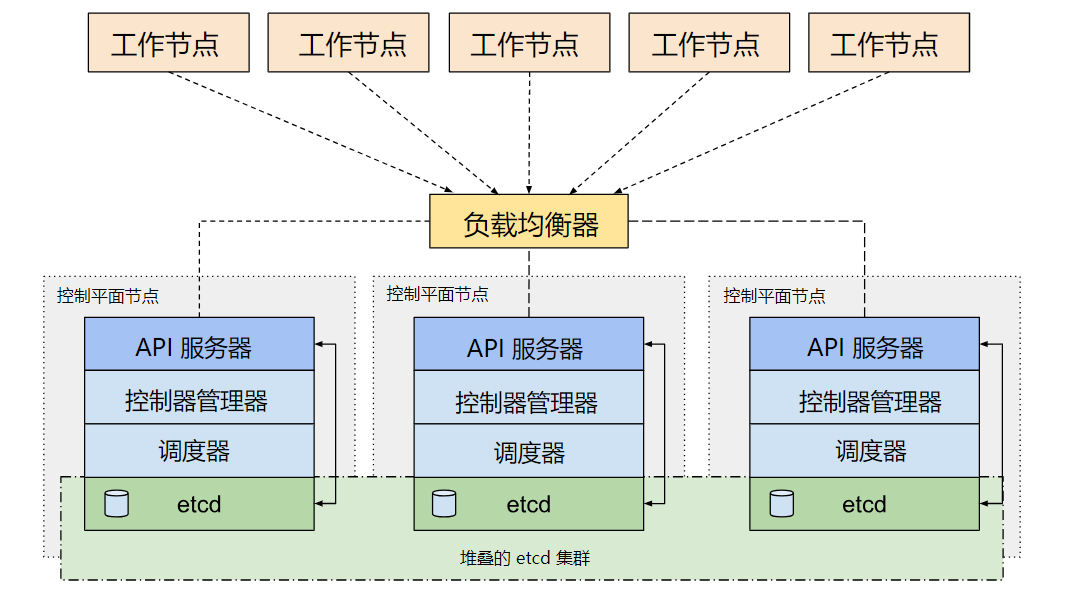
external etcd
使用外部 etcd 节点,其中 etcd 在与控制平面不同的节点上运行。这种拓扑结构解耦了控制平面和 etcd 成员。因此它提供了一种 HA 设置, 其中失去控制平面实例或者 etcd 成员的影响较小,并且不会像stacked模型的 HA 拓扑那样影响集群冗余。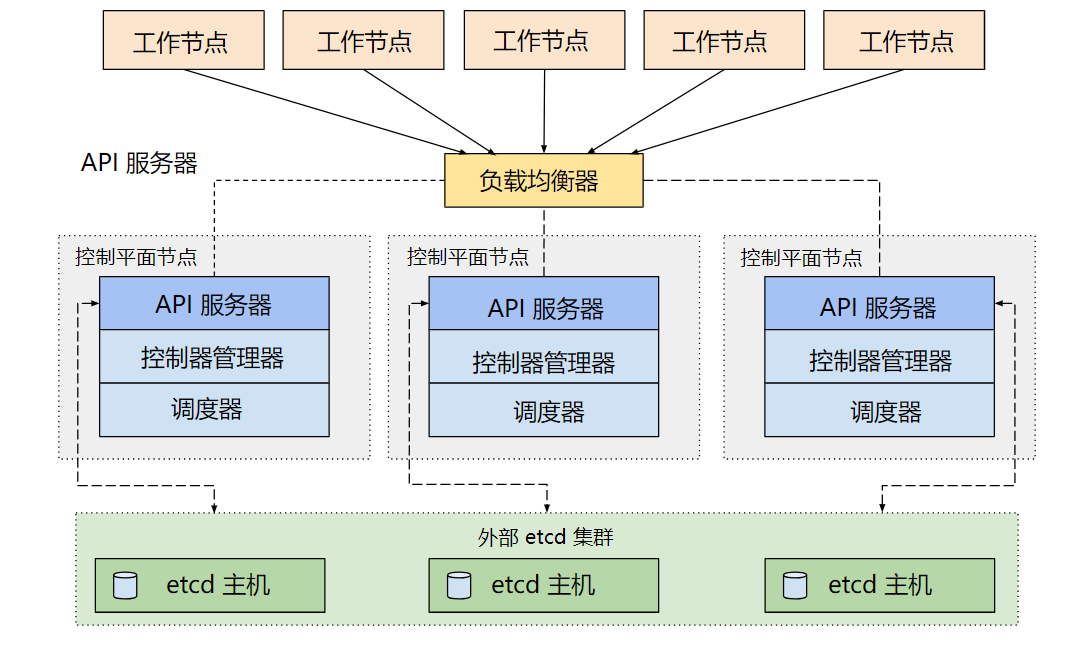
参考文档
https://kubernetes.io/zh-cn/docs/setup/production-environment/tools/kubeadm/