
(目录)
c++ STL标准库 https://zh.cppreference.com/w/%e9%a6%96%e9%a1%b5
一、c++随机数生成


上图引自:https://hackingcpp.com/cpp/std/random_distributions.png
#include <iostream>
#include <random>

using namespace std;

int main(int argc, const char **argv) {
	random_device rd; //随机种子

	// 简单使用
//	for (int i = 0; i < 5; ++i) {
//		cout << "random " << i << ": " << rd() % 10 << endl;
//	}

    // 1. 确定随机数生成器
    //mt19937 mt(rd());
	default_random_engine re(rd());

	// 2. 设置随机数的分布。初始化参数使用小括号,大括号都行({}可以防止类型收窄——比如:int -> char)。
	uniform_int_distribution<int> dis1 { 20, 30 }; // 均匀分步:生成从 [20,30] 的随机整数
	normal_distribution<double> dis2 { 0, 1 }; // 标准正态分布:0是均值,1是标准差
	bernoulli_distribution dis3(0.5); // 伯努利分布:生成0或1的随机数。参数表示生成1的概率。

	// 3. 生成随机数
	for (int i = 0; i < 5; ++i) {
		cout << "uniform dist " << i << ": " << dis1(re) << endl;
		cout << "normal dist " << i << ": " << dis2(re) << endl;
		cout << "bernoulli dist " << i << ": " << dis3(re) << endl;
	}

	return 0;
}
二、STL算法库
可参考:https://hackingcpp.com/ 
三、Eclipse CDT的使用
1. Eclipse下载安装


下载Eclipse IDE for C/C++ Developers。可以选择中国大陆的镜像。 解压下载的离线安装包之后可以发现JDK环境已经有了,无需再单独安装。
2. 下载配置 MinGW-w64
- 一般性使用 MinGW-w64下载地址: https://sourceforge.net/projects/mingw-w64/files/mingw-w64/mingw-w64-release/ 推荐下载:x86_64-win32-seh(x86_64-8.1.0-release-win32-seh-rt_v6-rev0.7z),绿色安装。
- 推荐使用 官网:https://www.mingw-w64.org/ 然后访问Downloads
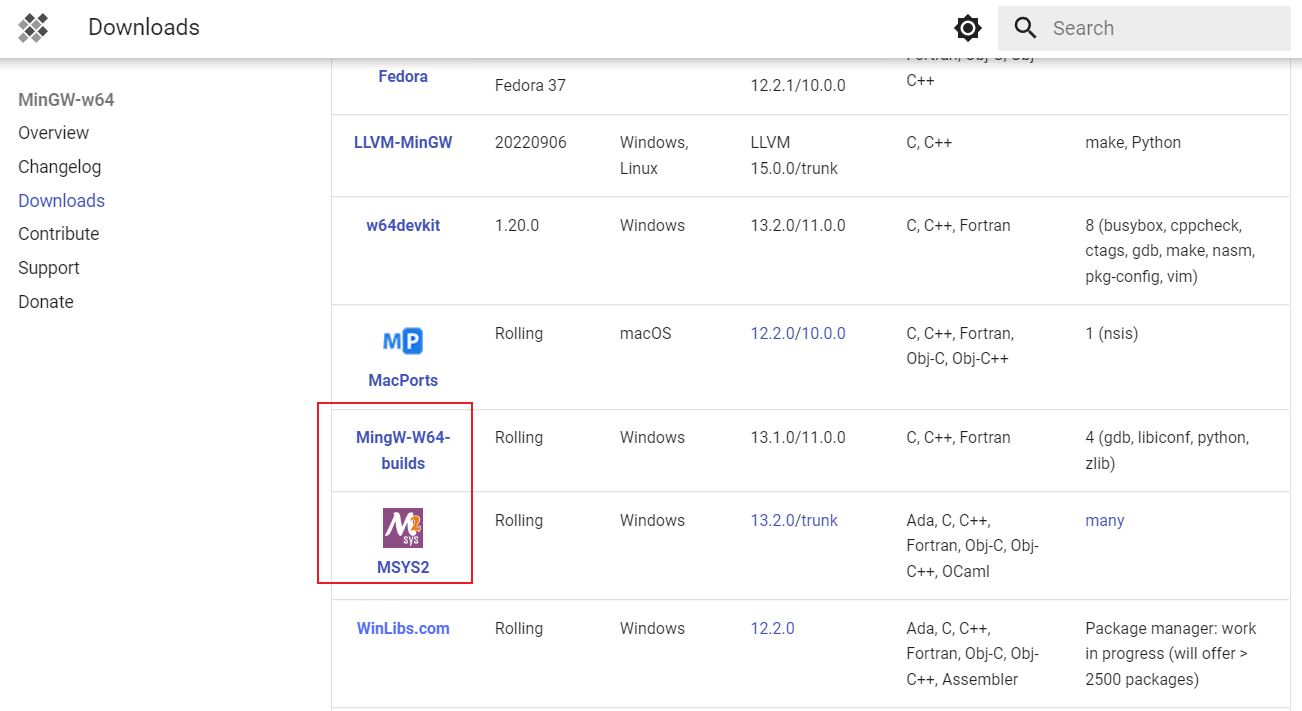 如果需要编译第三方库,可以使用MSYS2(https://www.msys2.org/)。 MSYS2中可使用pacman包管理器。pacman也是Arch Linux的包管理工具, 通过msys2.exe进入MSYS2的shell控制台,在/etc/pacman.d/mirrorlist.mingw64中修改镜像源。
 如果需要编译第三方库,可以使用MSYS2(https://www.msys2.org/)。 MSYS2中可使用pacman包管理器。pacman也是Arch Linux的包管理工具, 通过msys2.exe进入MSYS2的shell控制台,在/etc/pacman.d/mirrorlist.mingw64中修改镜像源。
# See https://www.msys2.org/dev/mirrors

## Primary
Server = https://mirrors.aliyun.com/msys2/mingw/x86_64/
Server = https://mirrors.tencent.com/msys2/mingw/x86_64/

## Tier 1
Server = https://mirrors.tuna.tsinghua.edu.cn/msys2/mingw/x86_64/
Server = https://mirrors.bfsu.edu.cn/msys2/mingw/x86_64/
Server = https://mirrors.ustc.edu.cn/msys2/mingw/x86_64/
Server = https://mirror.nju.edu.cn/msys2/mingw/x86_64/
## Tier 2
Server = https://mirrors.sjtug.sjtu.edu.cn/msys2/mingw/x86_64/
Server = https://mirrors.bit.edu.cn/msys2/mingw/x86_64/
Server = https://mirror.iscas.ac.cn/msys2/mingw/x86_64/
常用的pacman安装命令如下:
也可以参考:https://wiki.archlinux.org/title/pacman
# 更新软件包(y:yes,u:update)
pacman -Syu
# 安装工具链
pacman -S --needed base-devel mingw-w64-x86_64-toolchain
# 查找cmake是否已安装
pacman -Qs cmake 或者 pacman -Ss cmake
# 安装cmake
pacman -S  mingw-w64-x86_64-cmake
# 安装neovim
pacman -S mingw-w64-x86_64-neovim
# 安装git
pacman -S git
# 安装mingw下的Autotools
pacman -S "${MINGW_PACKAGE_PREFIX}-autotools"
也可以使用MingW-W64-builds(https://github.com/niXman/mingw-builds-binaries/releases)。 然后下载:
# 运行库MSVCRT(Microsoft Visual C++ Runtime)。MSVCRT 提供了许多与标准 C 库兼容的函数,但不支持新的 C11 和 C++11 标准。
x86_64-13.1.0-release-win32-seh-msvcrt-rt_v11-rev1.7z
# 运行库UCRT(Universal CRT)。UCRT 提供了许多与标准 C 库兼容的函数,并支持新的 C11 和 C++11 标准。UCRT 适用于 Windows 10 或更高版本的操作系统。
x86_64-13.1.0-release-win32-seh-ucrt-rt_v11-rev1.7z
需要配置的环境变量:
- Path 加入 mingw64\bin
3. Eclipse CDT的基本设置
- 字符编码 Windows -> Preferences-> General -> Workspace -> Text file encoding -> Other: UTF-8 Eclipse CDT的文件编码与终端编码默认相同。
- 界面主题 Windows -> Preferences-> General -> Appearance -> Theme
- 保存动作 Windows -> Preferences-> C/C++ -> Editor -> Save Actions
- 代码风格 Windows -> Preferences-> C/C++ -> Code Style -> Formatter
- 字体设置 Windows -> Preferences-> General -> Appearance -> Colors and Fonts Basic: Text Font C/C++: Editor -> C/C++ Editor Text Font
- 代码模版配置 Windows -> Preferences-> C/C++ -> Editor -> Templates 可以改一下main,加一下while和cout等。
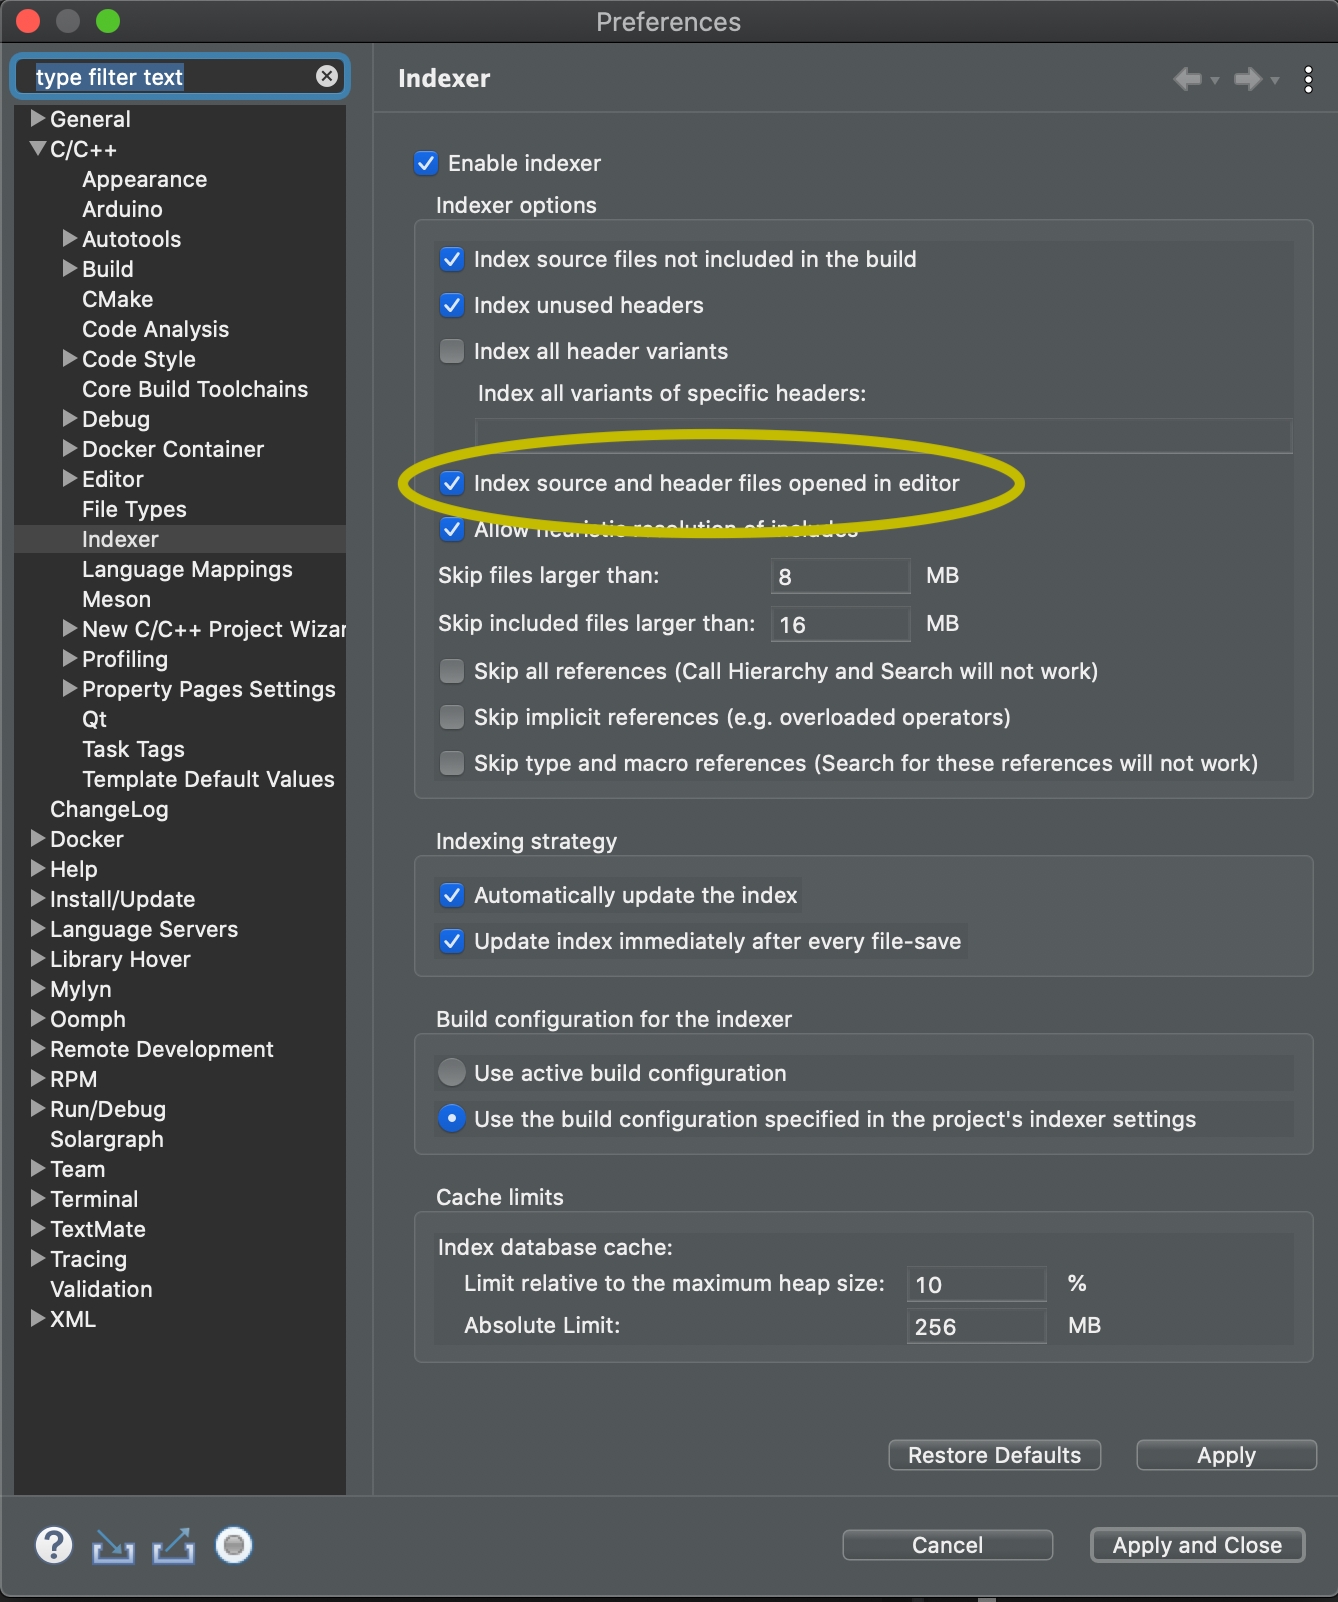
Alt + /用于触发模版代码补全。可以如下修改: Windows -> Preferences-> General -> Keys,找到 C/C++ Content Assist(Template Proposals),Binding: Tab - 配置文件索引

4. CMake的配置
- CMake下载地址:https://cmake.org/download/
- 配置文件CMakeLists.txt的例子:
cmake_minimum_required(VERSION 3.15)
project(testbed)

set(CMAKE_CXX_STANDARD 11)
set(CMAKE_CXX_EXTENSIONS OFF)
set(CMAKE_CXX_STANDARD_REQUIRED ON)

set(CMAKE_EXPORT_COMPILE_COMMANDS ON)

#add_definitions("-Wall -g -fexec-charset=gbk")
add_definitions("-Wall -g")

aux_source_directory("${CMAKE_CURRENT_SOURCE_DIR}/src" SRC)

include_directories(${CMAKE_CURRENT_SOURCE_DIR}/src/include ${CMAKE_CURRENT_SOURCE_DIR}/../../boost_1_81_0)

#find_package(SQLiteCpp REQUIRED)

add_executable(testbed ${SRC})
#target_link_libraries(testbed PRIVATE SQLiteCpp)
-
对Eclipse CDT的CMake配置: Windows -> Preferences-> C/C++ -> CMake -> Add…(加入cmake.exe的路径)
-
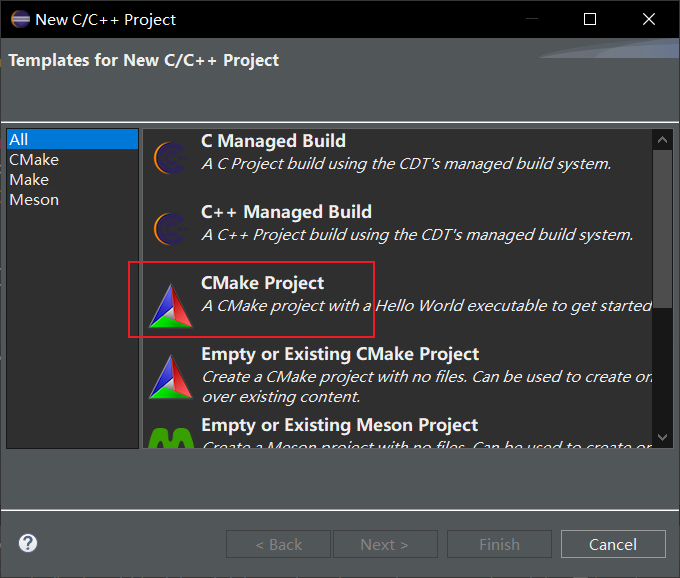
创建CMake项目:
-
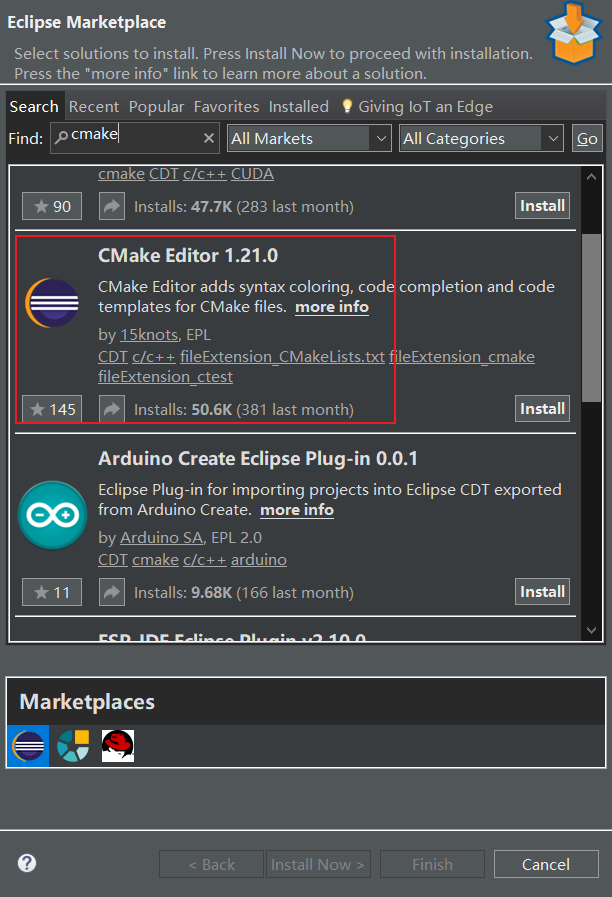
安装CMake插件:
-
配置CMake插件
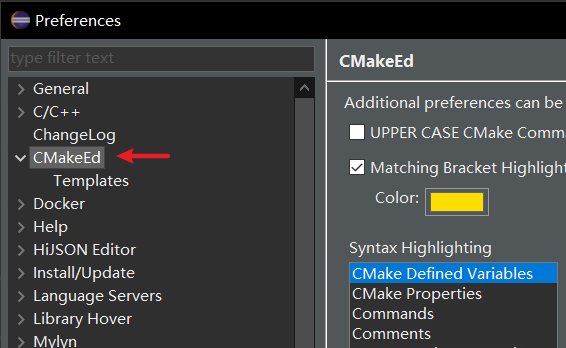


主要是模版和颜色字体设置。颜色可以使用“Snipaste”来取色。
四、c++的文件系统库
头文件:#include <filesystem> 命名空间:std::filesystem c++17标准开始支持。
1. 路径path
#include <iostream>
#include <string>
#include <filesystem>

using namespace std;
namespace fs = std::filesystem;

int main(int argc, const char **argv) {
	fs::path pth1 = "D:\\tmp";
	fs::path pth2 = fs::current_path();

	pth1.append("aaa").append("bbb");
	pth1 /= "ccc";
	pth1.concat("_ddd");
	pth1 += "_eee";
	pth1.concat("/fff/hhh").make_preferred();

	pth2.remove_filename().replace_filename("test01").replace_extension("txt");

	cout << pth1 << endl;
	cout << pth2 << endl;
	cout << pth2.filename() << endl;
	cout << pth2.filename().extension() << endl;

	cout << pth1.root_name() << endl;
	cout << pth1.root_path() << endl;
	cout << pth1.relative_path() << endl;

	return 0;
}
2. 遍历目录
#include <iostream>
#include <string>
#include <filesystem>

using namespace std;
namespace fs = std::filesystem;

int main(int argc, const char **argv) {
	fs::path dir = fs::current_path();
	fs::directory_iterator files(dir);

	cout << boolalpha;
	// const fs::directory_entry
	for (auto &file : files) {
		cout << file.path().filename() << "存在:" << file.exists() << endl;
		cout << "目录:" << file.is_directory() << endl;
		cout << "文件吗:" << file.is_regular_file() << endl;

		if (file.path().string().ends_with("txt")) { // ends_with(): c++23支持
			cout << "文件大小:" << file.file_size() << endl;
		}
	}

	return 0;
}
另一种迭代方式:
#include <iostream>
#include <string>
#include <filesystem>

using namespace std;
namespace fs = std::filesystem;

int main(int argc, const char **argv) {
	fs::path dir = fs::current_path();
	fs::directory_iterator files(dir);

	for (auto file = begin(files); file != end(files); file++) {
		if (file->path().string().rfind("txt") != string::npos) {
			cout << file->path() << endl;
		}
	}
	return 0;
}
3. 递归子目录
#include <iostream>
#include <string>
#include <filesystem>
#include <regex>

using namespace std;
namespace fs = std::filesystem;

int main(int argc, const char **argv) {
	fs::path dir = fs::current_path();
	fs::recursive_directory_iterator files(dir);

	regex re(R"(.+cpp$)");

	for (auto &file : files) {
		if (regex_match(file.path().string(), re)) {
			cout << file.path() << endl;
		}
	}

	return 0;
}
4. 文件操作
#include <iostream>
#include <string>
#include <filesystem>

using namespace std;
namespace fs = std::filesystem;

int main(int argc, const char **argv) {
	fs::path dir = fs::current_path();
	fs::copy(dir / "CMakeLists.txt", dir / "a.bak");
	fs::create_directory(dir / "aaa");

	return 0;
}