文章目录
- HAProxy介绍
- 环境准备
- haproxy安装
- 七层负载均衡配置及测试
- https 四层负载均衡测试
- 七层IP透传测试
- 四层IP透传测试
HAProxy介绍
HAProxy提供高可用性、负载均衡以及基于TCP和HTTP应用的代理,支持虚拟主机,免费、快速并且可靠的一种解决方案。HAProxy特别适用于那些负载特大的web站点,这些站点通常又需要会话保持或七层处理。HAProxy运行在当前的硬件上,完全可以支持数以万计的并发连接。
但是haproxy 不支持作为静态服务器
环境准备
准备三台虚拟机 如下
192.168.47.10 centos7.8 haproxy
192.168.47.12 centos7.8 web服务1
192.168.47.13 centos7.8 web服务2
web服务 会返回 服务器ip信息如下
[root@host12 ~]# curl http://192.168.47.13:9080
{"message":"测试程序,服务器ip:192.168.47.12,端口:9080"}
haproxy安装
安装包下载地址:haproxy1.8.10.tar.gz 下载linux安装包,并解压如下:
drwxrwxr-x. 10 root root    4096 Jun 22  2018 haproxy-1.8.10
-rw-r--r--.  1 root root 8734720 Apr 12  2022 haproxy-1.8.10.tar.gz
lrwxrwxrwx.  1 root root      14 Apr 12 05:07 proxy -> haproxy-1.8.10
编译安装
[root@host10 ~]# cd proxy/
[root@host10 proxy]# make TARGET=linux26  这个命令报错
[root@host10 proxy]# make TARGET=linux2628 prefix=/usr/local/haproxy  这个命令可以正常编译  应该是target 涉及到linux版本的问题  这里linux版本centos 7.8
[root@host10 proxy]# make install PREFIX=/usr/local/haproxy
七层负载均衡配置及测试
添加专门的用户和组
#添加haproxy组
 groupadd -r haproxy
 #创建nginx运行账户haproxy并加入到haproxy组,不允许haproxy用户直接登录系统
 useradd -r -g haproxy -M -s /sbin/nologin haproxy
增加配置文件 如下:
mkdir -p /usr/local/haproxy/conf log errorfiles
 touch /usr/local/haproxy/conf/haproxy.cfg


global
    log    127.0.0.1 local3 info
    chroot  /usr/local/haproxy
    pidfile  /var/run/haproxy.pid
    maxconn  65530
    user   haproxy
    group   haproxy
    daemon
defaults
    log     global
    log     127.0.0.1 local3 info
    mode    http
    option  httplog
    option  dontlognull
    option  httpclose
    retries   3
    maxconn 65530
    timeout http-request    10s
    timeout queue           1m
    timeout connect         60s
    timeout client          2m
    timeout server          2m
    timeout http-keep-alive 10s
    timeout check           10s

frontend frontend_emqx_tcp
    bind *:80
    option tcplog
    mode http
    default_backend backend_emqx_tcp
backend backend_emqx_tcp
    mode http
    balance roundrobin
    server emqx_node_1 192.168.47.12:9080 check
    server emqx_node_2 192.168.47.13:9080 check
启动并访问 hahroxy服务器 发现 后台web服务被轮流访问
[root@host10 haproxy]# sbin/haproxy -f conf/haproxy.cfg


https 四层负载均衡测试
代理https服务有两种方式,一种是 证书配置在 haproxy 上,后端web服务器 采用http访问,还有一种方式是 haproxy只做转发,后台web服务采用https发布。这里采用第二种演示
提两个httpsweb服务 详情如下:
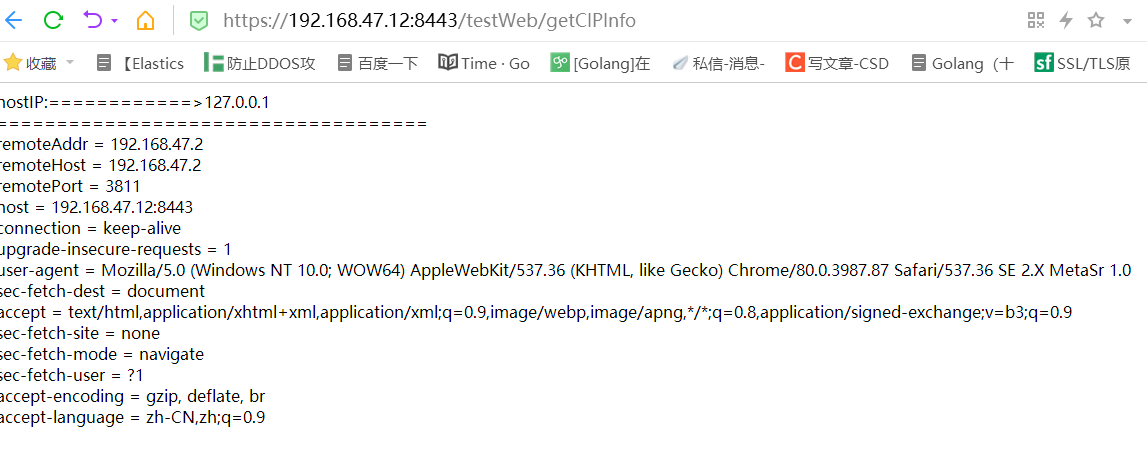
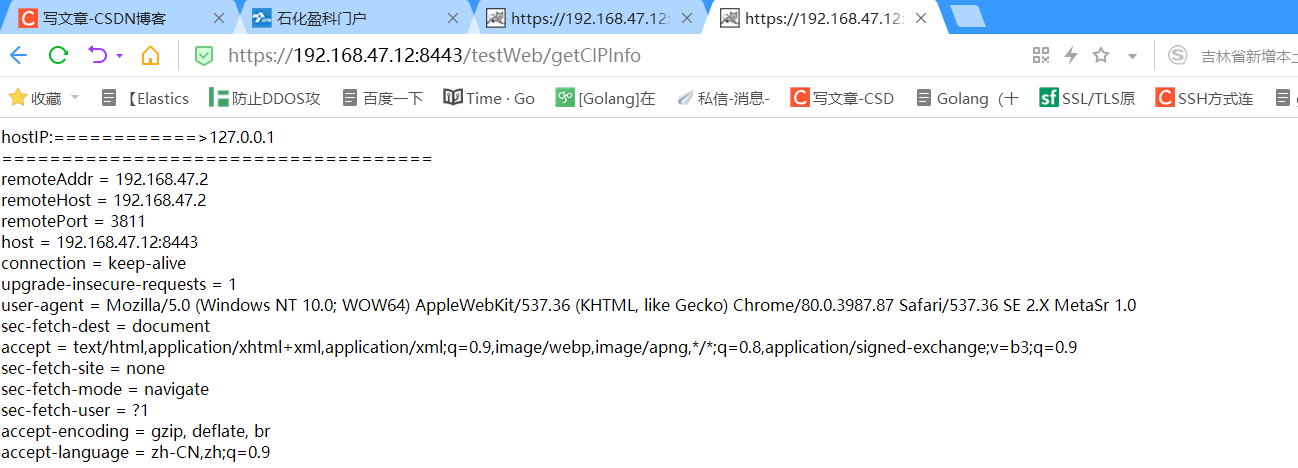
修改haproxy配置文件
[root@host10 haproxy]# vi conf/haproxy.cfg
global
    log    127.0.0.1 local3 info
    chroot  /usr/local/haproxy
    pidfile  /var/run/haproxy.pid
    maxconn  65530
    user   haproxy
    group   haproxy
    daemon
defaults
    log     global
    log     127.0.0.1 local3 info
    mode    http
    option  httplog
    option  dontlognull
    option  httpclose
    retries   3
    maxconn 65530
    timeout http-request    10s
    timeout queue           1m
    timeout connect         60s
    timeout client          2m
    timeout server          2m
    timeout http-keep-alive 10s
    timeout check           10s

frontend frontend_emqx_tcp
    bind *:443
    option tcplog
    mode tcp
    default_backend backend_emqx_tcp
backend backend_emqx_tcp
    mode tcp
    balance roundrobin
    server emqx_node_1 192.168.47.11:8443 check
    server emqx_node_2 192.168.47.12:8443 check
listen haproxy_status    ----增加控制台配置
    bind *:9800
    mode http
    option httplog
    maxconn 200
    stats refresh 120s
    log 127.0.0.1 local0 err
    stats uri /haproxy-status
    stats realm welcome login\haproxy
    stats auth admin:123456
    stats hide-version
    stats admin if TRUE
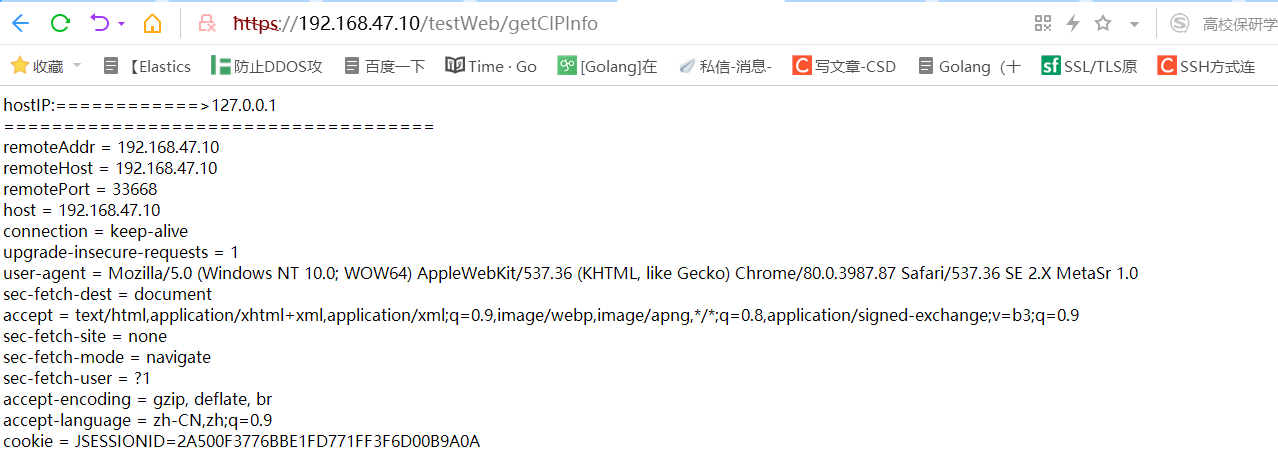
访问成功,可以看到 后台web服务拿到的 客户端ip是192.168.47.10 (haproxy的IP)
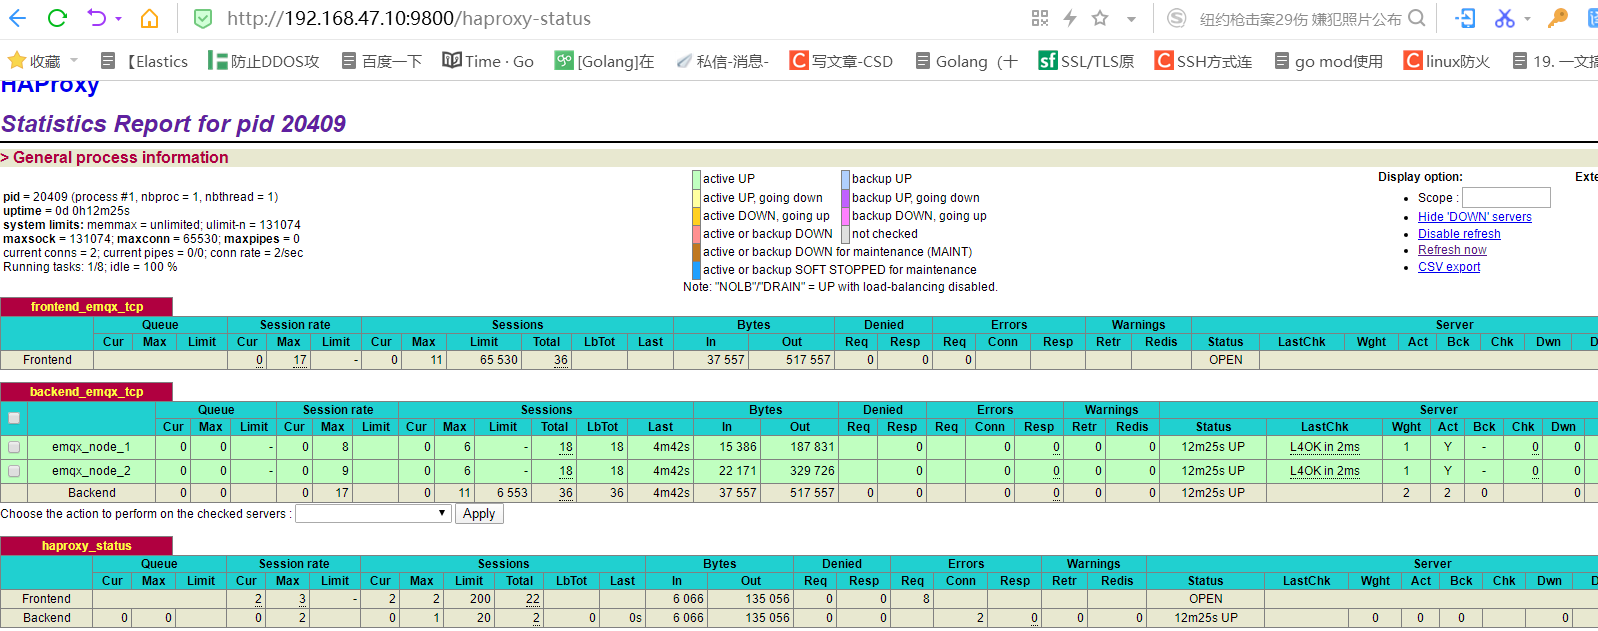
可以通过 http://192.168.47.10:9800/haproxy-status 查看haproxy 的控制台,如下:
七层IP透传测试
原理同nginx通过配置将客户端ip添加到 xforwordefor 请求头中,具体如下:
global
    log    127.0.0.1 local3 info
    chroot  /usr/local/haproxy
    pidfile  /var/run/haproxy.pid
    maxconn  65530
    user   haproxy
    group   haproxy
    daemon
defaults
    log     global
    log     127.0.0.1 local3 info
    mode    http
    option  httplog
    option  dontlognull
    option  httpclose
#    option  forwardfor
    retries   3
    maxconn 65530
    timeout http-request    10s
    timeout queue           1m
    timeout connect         60s
    timeout client          2m
    timeout server          2m
    timeout http-keep-alive 10s
    timeout check           10s

frontend frontend_http
    bind *:80
    option tcplog
    option forwardfor
    mode http
    default_backend backend_http
backend backend_http
    mode http
    balance roundrobin
    server emqx_node_1 192.168.47.11:8080 check
    server emqx_node_2 192.168.47.12:8080 check

frontend frontend_https
    bind *:443
    option tcplog
    mode tcp
    default_backend backend_https
backend backend_https
    mode tcp
    balance roundrobin
    server emqx_node_3 192.168.47.11:8443 check
    server emqx_node_4 192.168.47.12:8443 check
listen haproxy_status
    bind *:9800
    mode http
    option httplog
    maxconn 200
    stats refresh 120s
    log 127.0.0.1 local0 err
    stats uri /haproxy-status
    stats realm welcome login\haproxy
    stats auth admin:123456
    stats hide-version
    stats admin if TRUE
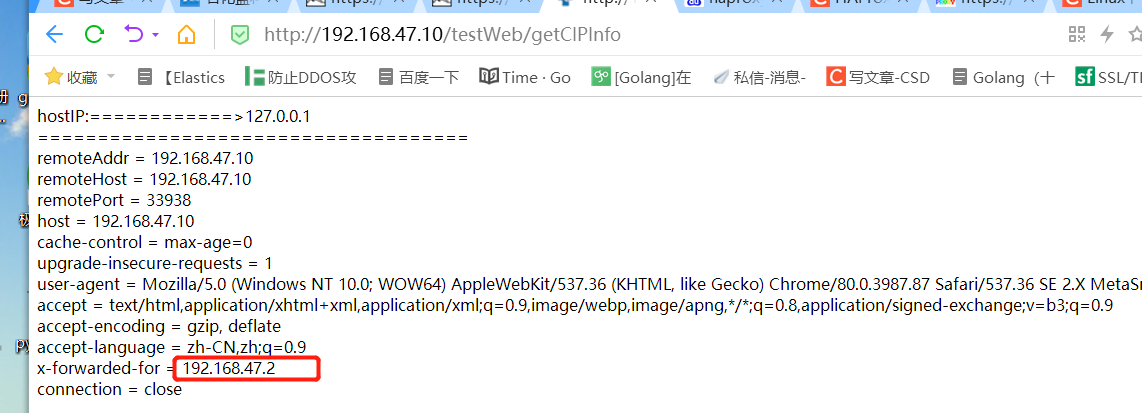
针对 http 的请求 增加了 option forwardfor 支持 forwardfor 发现 客户端ip被添加到了 xforwardfor 请求头中
四层IP透传测试
haproxy四层透传ip实现方式 是通过支持proxy-protocal 协议来实现,拿到四层流量后将客户端ip信息写入到数据包中,后端服务也必须支持proxy-protocal ,否则会报错。测试如下:
haproxy 配置如下:
global
    log    127.0.0.1 local3 info
    chroot  /usr/local/haproxy
    pidfile  /var/run/haproxy.pid
    maxconn  65530
    user   haproxy
    group   haproxy
    daemon
defaults
    log     global
    log     127.0.0.1 local3 info
    mode    http
    option  httplog
    option  dontlognull
    option  httpclose
#    option  forwardfor
    retries   3
    maxconn 65530
    timeout http-request    10s
    timeout queue           1m
    timeout connect         60s
    timeout client          2m
    timeout server          2m
    timeout http-keep-alive 10s
    timeout check           10s

frontend frontend_http
    bind *:80
    option tcplog
    option forwardfor
    mode http
    default_backend backend_http
backend backend_http
    mode http
    balance roundrobin
    server emqx_node_1 192.168.47.11:8080 check
    server emqx_node_2 192.168.47.12:8080 check

frontend frontend_https
    bind *:443
    option tcplog
    mode tcp
    default_backend backend_https
backend backend_https
    mode tcp
    balance roundrobin
   # server emqx_node_3 192.168.47.11:8443 send-proxy  check
   #server emqx_node_4 192.168.47.12:8443  check
   server emqx_node_5 192.168.47.10:808 send-proxy check    --四层在代理服务器后 增加 send-proxy 配置

listen haproxy_status
    bind *:9800
    mode http
    option httplog
    maxconn 200
    stats refresh 120s
    log 127.0.0.1 local0 err
    stats uri /haproxy-status
    stats realm welcome login\haproxy
    stats auth admin:123456
    stats hide-version
    stats admin if TRUE
重新启动haproxy 服务
nginx 支持 proxy_protocal,因此后端服务器我们使用nginx,tomcat 不支持 如果后端服务器是tomcat 那么代理会不成功,tomcat读取请求包会报错。
nginx 安装 需要带有 realip等模块如下:–nginx版本 1.20
./configure --with-http_stub_status_module --with-http_ssl_module --with-openssl=/root/openssl-1.0.2u --with-http_realip_module
nginx 核心配置如下:
http {
    include       mime.types;
    default_type  application/octet-stream;

    log_format  main  '$remote_addr - $remote_user [$time_local] "$request" '
                      '$status $body_bytes_sent "$http_referer" '
                      '"$http_user_agent" "$http_x_forwarded_for"  "$proxy_protocol_addr" "endhhhhhhhh====="';

    access_log  logs/access.log  main;

    sendfile        on;
    #tcp_nopush     on;

    #keepalive_timeout  0;
    keepalive_timeout  65;

    #gzip  on;

    server {
        #listen   808;
        listen 808 proxy_protocol;  --增加 proxy_protocol 协议支持,如果没有这个配置,那么会和tomcat一样报错。同时加了这个配置后无法从浏览器直接访问
        server_name  localhost;

        #charset koi8-r;
        real_ip_header  proxy_protocol_addr;
        #access_log  logs/host.access.log  main;

        location / {
            proxy_pass http://192.168.47.12:8080;
            proxy_set_header Host $host;
            proxy_set_header X-Real-IP $proxy_protocol_addr;  --将从proxy_protocol  读到的ip 设置到请求头中
            proxy_set_header X-Forwarded-For $proxy_add_x_forwarded_for;
        }
    }
}
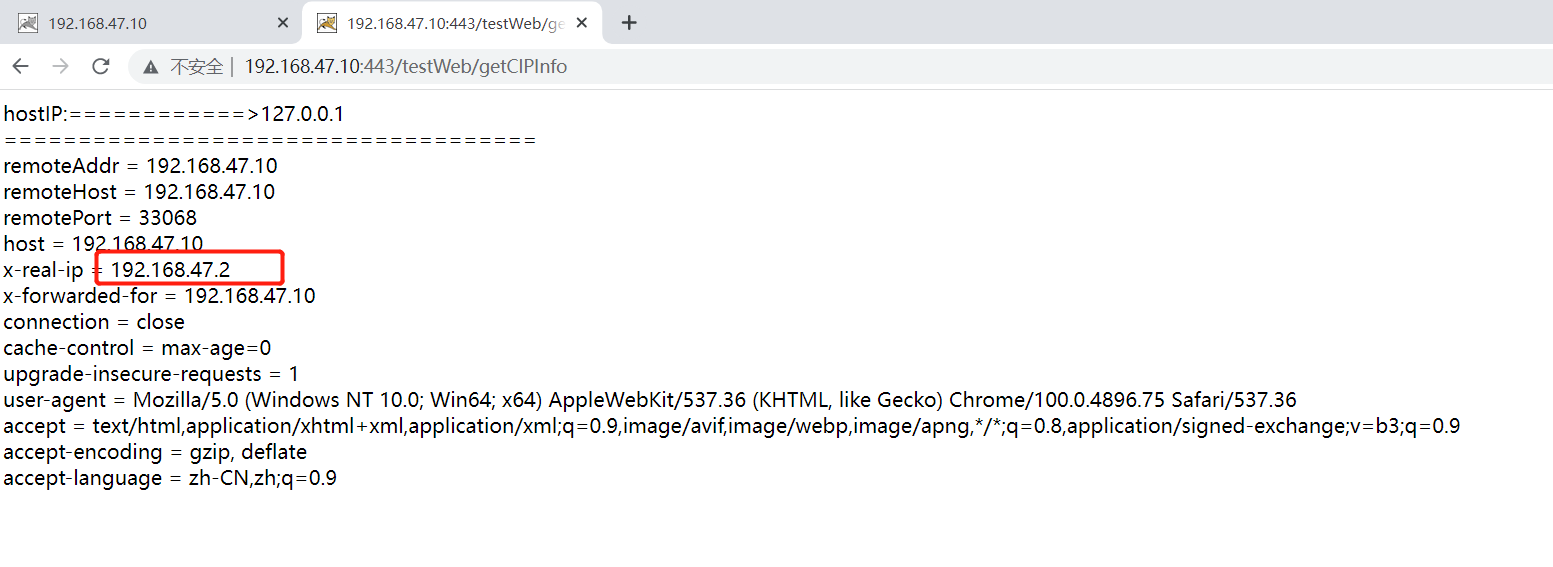
访问测试可以看到 真实的用户ip被设置到了请求头中
同时观察nginx 日志 也可以看到 用户真实ip


