介绍: Ngin x是一个高性能的http和反向代理web服务器,同时也提供了IMAP/POP3/SMTP服务,特点:占有内存少,并发能力强。作为中间件具有如下功能:1、制作静态页面 2、反向代理 3、负载均衡 4、动静分离 5、会话保持
端口号:80
主配置文件:vim /usr/local/nginx/conf/nginx.conf
负载均衡的三种方式
负载均衡有三种部署方式:路由模式、桥接模式、服务直接返回模式。路由模式部署灵活,约60%的用户采用这种方式部署;桥接模式不改变现有的网络架构;服务直接返回(DSR)比较适合吞吐量大特别是内容分发的网络应用。约30%的用户采用这种模式。
1、路由模式(推荐)
路由模式的部署方式,服务器的网关必须设置成负载均衡机的LAN口地址,且与WAN口分署不同的逻辑网络。因此所有返回的流量也都经过负载均衡。这种方式对网络的改动小,能均衡任何下行流量。
2、桥接模式
桥接模式配置简单,不改变现有网络。负载均衡的WAN口和LAN口分别连接上行设备和下行服务器。LAN口不需要配置IP(WAN口与LAN口是桥连接),所有的服务器与负载均衡均在同一逻辑网络中。
由于这种安装方式容错性差,网络架构缺乏弹性,对广播风暴及其他生成树协议循环相关联的错误敏感,因此一般不推荐这种安装架构。
3、服务直接返回模式
这种安装方式负载均衡的LAN口不使用,WAN口与服务器在同一个网络中,互联网的客户端访问负载均衡的虚IP(VIP),虚IP对应负载均衡机的WAN口,负载均衡根据策略将流量分发到服务器上,服务器直接响应客户端的请求。因此对于客户端而言,响应他的IP不是负载均衡机的虚IP(VIP),而是服务器自身的IP地址。也就是说返回的流量是不经过负载均衡的。因此这种方式适用大流量高带宽要求的服务。
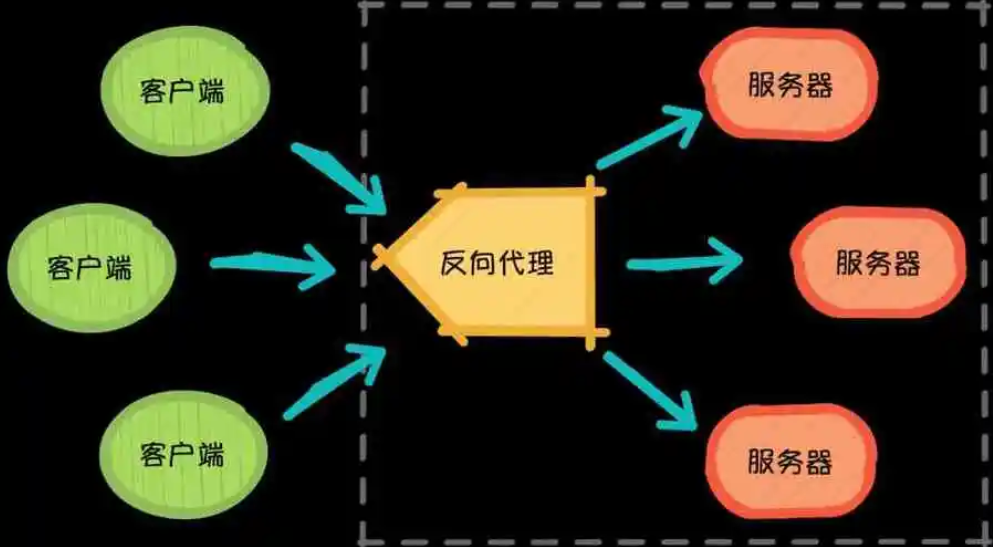
接下来就用nginx来实操一下反向代理!!!!
1、WEB服务器环境准备
准备5台服务器
2、环境配置
1.克隆HA1/HA2/WEB1/WEB2/WEB3
2.开机启动 - 修改主机名字 - IP地址 - 修改软件源 - yum cache
3.WEB构建完毕-apache
HA1主机配置
[root@localhost ~]# hostnamectl set-hostname HA1 && bash
[root@ha1 ~]# mkdir /etc/yum.repos.d/bak
[root@ha1 ~]# mv /etc/yum.repos.d/*.repo /etc/yum.repos.d/bak/
[root@ha1 ~]# wget -O /etc/yum.repos.d/CentOS-Base.repo https://mirrors.aliyun.com/repo/Centos-7.repo && yum clean all && yum makecache
[root@ha1 html]# systemctl stop firewalld.service && systemctl disable firewalld.service
HA2主机配置
[root@localhost ~]# hostnamectl set-hostname HA2 && bash
[root@ha2 ~]# mkdir /etc/yum.repos.d/bak
[root@ha2 ~]# mv /etc/yum.repos.d/*.repo /etc/yum.repos.d/bak/
[root@ha2 ~]# wget -O /etc/yum.repos.d/CentOS-Base.repo https://mirrors.aliyun.com/repo/Centos-7.repo && yum clean all && yum makecache
[root@ha2 html]# systemctl stop firewalld.service && systemctl disable firewalld.service
web1
[root@localhost ~]# hostnamectl set-hostname web1 && bash
[root@web1 ~]# mkdir /etc/yum.repos.d/bak
[root@web1 ~]# mv /etc/yum.repos.d/*.repo /etc/yum.repos.d/bak/
[root@web1 ~]# wget -O /etc/yum.repos.d/CentOS-Base.repo https://mirrors.aliyun.com/repo/Centos-7.repo && yum clean all && yum makecache
[root@web1 ~]# systemctl stop firewalld.service && systemctl disable firewalld.service
[root@web1 ~]# yum install -y httpd
[root@web1 ~]# echo "web-server1" >> /var/www/html/index.html
[root@web1 ~]# systemctl start httpd.service && systemctl enable httpd.service && systemctl status httpd.service
web2
[root@localhost ~]# hostnamectl set-hostname web2 && bash
[root@web2 ~]# mkdir /etc/yum.repos.d/bak
[root@web2 ~]# mv /etc/yum.repos.d/*.repo /etc/yum.repos.d/bak/
[root@web2 ~]# wget -O /etc/yum.repos.d/CentOS-Base.repo https://mirrors.aliyun.com/repo/Centos-7.repo && yum clean all && yum makecache
[root@web2 ~]# systemctl stop firewalld.service && systemctl disable firewalld.service
[root@web2 ~]# yum install -y httpd
[root@web2 ~]# echo "web-server1" >> /var/www/html/index.html
[root@web2 ~]# systemctl start httpd.service && systemctl enable httpd.service && systemctl status httpd.service
web3
[root@localhost ~]# hostnamectl set-hostname web3 && bash
[root@web3 ~]# mkdir /etc/yum.repos.d/bak
[root@web3 ~]# mv /etc/yum.repos.d/*.repo /etc/yum.repos.d/bak/
[root@web3 ~]# wget -O /etc/yum.repos.d/CentOS-Base.repo https://mirrors.aliyun.com/repo/Centos-7.repo && yum clean all && yum makecache
[root@web3 ~]# systemctl stop firewalld.service && systemctl disable firewalld.service
[root@web3 ~]# yum install -y httpd
[root@web3 ~]# echo "web-server1" >> /var/www/html/index.html
[root@web3 ~]# systemctl start httpd.service && systemctl enable httpd.service && systemctl status httpd.service
3、Nginx软件部署(只在两个HA节点上部署)
HA1
安装nginx软件
[root@ha1 ~]# wget -O /etc/yum.repos.d/epel.repo http://mirrors.aliyun.com/repo/epel-7.repo
[root@ha1 ~]# yum install -y nginx nginx-mod-stream
[root@ha1 ~]# systemctl daemon-reload && systemctl start nginx && systemctl enable nginx && systemctl status nginx
[root@ha1 ~]# pstree -ap | grep -v grep | grep -i nginx
  |-nginx,10687
  |   |-nginx,10688
  |   `-nginx,10689
  [root@ha1 ~]# netstat -nltp | grep -i nginx
tcp        0      0 0.0.0.0:80              0.0.0.0:*               LISTEN      10687/nginx: master
tcp6       0      0 :::80                   :::*                    LISTEN      10687/nginx: master
Nginx反向代理-负载均衡部署
[root@ha1 ~]# cd /etc/nginx/
[root@ha1 nginx]# mv nginx.conf nginx.conf.bak
修改配置文件
[root@ha1 nginx]# vim nginx.conf
# For more information on configuration, see:
# * Official English Documentation: http://nginx.org/en/docs/
# * Official Russian Documentation: http://nginx.org/ru/docs/

user nginx;
worker_processes auto;
error_log /var/log/nginx/error.log;
# [alert] 18037#0: 1024 worker_connections are not enough
pid /run/nginx.pid;

# Load dynamic modules. See /usr/share/doc/nginx/README.dynamic.
include /usr/share/nginx/modules/*.conf;

events {
worker_connections 1024;  # 最多可以建这么多工作节点
}

##### add to config start #####
stream {
log_format main '$remote_addr $upstream_addr - [$time_local] $status
$upstream_bytes_sent';
access_log /var/log/nginx/web_cluster.log main;

# upstream-load_balance-Cluster 这个是负载均衡,下面就是负载均衡的配置
upstream web_cluster {
server 192.168.40.101:80; # server1 IP:port
server 192.168.40.102:80; # server2 IP:port
server 192.168.40.103:80; # server3 IP:port
}

server {
listen 80; # nginx proxy port -
proxy_pass web_cluster; # 添加这个就是反向代理
}

}
##### add to config end #####
注意:listen port 端⼝号码 - ⽤户访问访问端⼝
server1 IP:port 端⼝号码 - 后端服务的实际端⼝
检查Nginx配置⽂件格式
[root@ha1 nginx]# nginx -t nginx: the configuration file /etc/nginx/nginx.conf syntax is ok nginx: configuration file /etc/nginx/nginx.conf test is successful
重新加载配置⽂件
[root@ha1 nginx]# nginx -s reload
HA2
安装nginx软件
[root@ha2 ~]# wget -O /etc/yum.repos.d/epel.repo http://mirrors.aliyun.com/repo/epel-7.repo
[root@ha2 ~]# yum install -y nginx nginx-mod-stream
[root@ha2 ~]# systemctl daemon-reload && systemctl start nginx && systemctl enable nginx && systemctl status nginx
[root@ha2 ~]# pstree -ap | grep -v grep | grep -i nginx
[root@ha2 ~]# pstree -ap | grep -v grep | grep -i nginx
  |-nginx,10361
  |   |-nginx,10362
  |   `-nginx,10363
[root@ha2 ~]# netstat -nltp | grep -i nginx
tcp        0      0 0.0.0.0:80              0.0.0.0:*               LISTEN      10361/nginx: master
tcp6       0      0 :::80                   :::*                    LISTEN      10361/nginx: master
Nginx反向代理-负载均衡部署
[root@ha1 ~]# cd /etc/nginx/ [root@ha1 nginx]# mv nginx.conf nginx.conf.bak
修改配置文件
[root@ha1 nginx]# vim nginx.conf
# For more information on configuration, see:
# * Official English Documentation: http://nginx.org/en/docs/
# * Official Russian Documentation: http://nginx.org/ru/docs/

user nginx;
worker_processes auto;
error_log /var/log/nginx/error.log;
# [alert] 18037#0: 1024 worker_connections are not enough
pid /run/nginx.pid;

# Load dynamic modules. See /usr/share/doc/nginx/README.dynamic.
include /usr/share/nginx/modules/*.conf;

events {
worker_connections 1024;  # 最多可以建这么多工作节点
}

##### add to config start #####
stream {
log_format main '$remote_addr $upstream_addr - [$time_local] $status
$upstream_bytes_sent';
access_log /var/log/nginx/web_cluster.log main;

# upstream-load_balance-Cluster 这个是负载均衡,下面就是负载均衡的配置
upstream web_cluster {
server 192.168.40.101:80; # server1 IP:port
server 192.168.40.102:80; # server2 IP:port
server 192.168.40.103:80; # server3 IP:port
}

server {
listen 80; # nginx proxy port -
proxy_pass web_cluster; # 添加这个就是反向代理
}

}
检查Nginx配置⽂件格式
[root@ha2 nginx]# nginx -t
nginx: the configuration file /etc/nginx/nginx.conf syntax is ok
nginx: configuration file /etc/nginx/nginx.conf test is successful
重新加载配置⽂件
[root@ha2 nginx]# nginx -s reload

