环境
Centos7
RocketMQ 3.2.6
安装位置 /usr/local/alibaba-rockermq
外网ip 182.254.145.66
内网ip 10.105.23.114
安装
wget https://github.com/alibaba/RocketMQ/releases/download/v3.2.6/alibaba-rocketmq-3.2.6.tar.gz
tar alibaba-rocketmq-3.2.6.tar.gz
cd alibaba-rocketmq
启动
nohup sh mqnamesrv -n 10.105.23.114:9876 &
nohup sh mqbroker -n 10.105.23.114:9876
java测试
使用maven构建环境
1. <!-- http://mvnrepository.com/artifact/com.alibaba.rocketmq/rocketmq-client -->
2. <dependency>
3. <groupId>com.alibaba.rocketmq</groupId>
4. <artifactId>rocketmq-client</artifactId>
5. <version>3.2.3</version>
6. </dependency>
1. package rocketmq;
2.
3.
4. import java.util.Date;
5.
6.
7. import com.alibaba.rocketmq.client.exception.MQClientException;
8. import com.alibaba.rocketmq.client.producer.DefaultMQProducer;
9. import com.alibaba.rocketmq.client.producer.SendResult;
10. import com.alibaba.rocketmq.common.message.Message;
11.
12.
13. public class Producer {
14. public static void main(String[] args) throws MQClientException, InterruptedException {
15. new DefaultMQProducer("rmq-group");
16. "182.254.145.66:9876");
17. "rmq-instance");
18.         producer.start();
19. try {
20. for (int i = 0; i < 3; i++) {
21. new Message("TopicA-test",// topic
22. "TagA",// tag
23. new Date() + "Hello RocketMQ ,QuickStart" + i)
24. // body
25.                 );
26.                 SendResult sendResult = producer.send(msg);
27.             }
28. catch (Exception e) {
29.             e.printStackTrace();
30.         }
31.         producer.shutdown();
32.     }
33. }
34.
35.
36.
37.
38. package rocketmq;
39.
40.
41. import java.util.List;
42.
43.
44. import com.alibaba.rocketmq.client.consumer.DefaultMQPushConsumer;
45. import com.alibaba.rocketmq.client.consumer.listener.ConsumeConcurrentlyContext;
46. import com.alibaba.rocketmq.client.consumer.listener.ConsumeConcurrentlyStatus;
47. import com.alibaba.rocketmq.client.consumer.listener.MessageListenerConcurrently;
48. import com.alibaba.rocketmq.client.exception.MQClientException;
49. import com.alibaba.rocketmq.common.message.MessageExt;
50.
51.
52. public class Consumer {
53.
54. public static void main(String[] args) throws InterruptedException, MQClientException {
55. new DefaultMQPushConsumer("rmq-group");
56.
57. "182.254.145.66:9876");
58. "rmq-instance");
59. "TopicA-test", "TagA");
60.
61. new MessageListenerConcurrently() {
62. @Override
63. public ConsumeConcurrentlyStatus consumeMessage(
64.                     List<MessageExt> msgs, ConsumeConcurrentlyContext context) {
65. for (MessageExt msg : msgs) {
66. new String(msg.getBody()));
67.                 }
68. return ConsumeConcurrentlyStatus.CONSUME_SUCCESS;
69.             }
70.         });
71.         consumer.start();
72. "Consumer Started.");
73.     }
74. }
运行consumer后发现
com.alibaba.rocketmq.remoting.exception.RemotingConnectException: connect to <10.105.23.114:10911> failed
在nohup.out里发现
The broker[localhost, 10.105.23.114:10911] boot success. and name server is 182.254.145.65:9876
哎,看来还是外网内网ip的问题
上次在安装Tair的时候就碰到过类似的问题 详见 Centos7安装Tair及配置测试
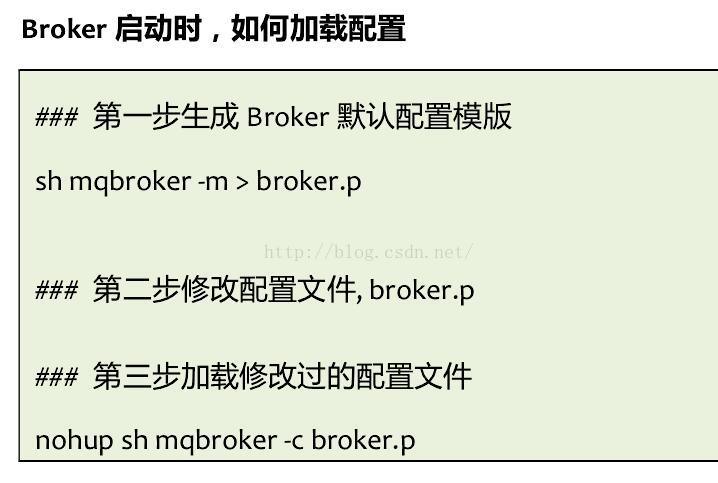
最后经过多方搜索,在官方的用户说明里看到下面的方法

经过我修改后的broker.p
1. namesrvAddr=127.0.0.1:9876
2. brokerIP1=182.254.145.66
3. brokerName=localhost
4. brokerClusterName=DefaultCluster
5. brokerId=0
6. autoCreateTopicEnable=true
7. autoCreateSubscriptionGroup=true
8. rejectTransactionMessage=false
9. fetchNamesrvAddrByAddressServer=false
10. storePathRootDir=/root/store
11. storePathCommitLog=/root/store/commitlog
12. flushIntervalCommitLog=1000
13. flushCommitLogTimed=false
14. deleteWhen=04
15. fileReservedTime=72
16. maxTransferBytesOnMessageInMemory=262144
17. maxTransferCountOnMessageInMemory=32
18. maxTransferBytesOnMessageInDisk=65536
19. maxTransferCountOnMessageInDisk=8
20. accessMessageInMemoryMaxRatio=40
21. messageIndexEnable=true
22. messageIndexSafe=false
23. haMasterAddress=
24. brokerRole=ASYNC_MASTER
25. flushDiskType=ASYNC_FLUSH
26. cleanFileForciblyEnable=true
ok!
这说明什么?说明第一手资料很重要
参考资料
http://www.jialeens.com/archives/681.html

