
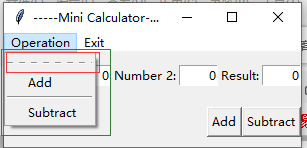
tkinter的菜单,程序运行的时候菜单之下出现了一个虚线项,如下图红色框:
点击这个虚线选项后,菜单单独浮于应用之上(如下图)。
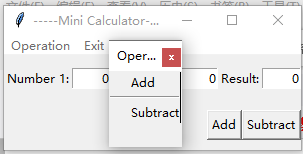
tearoff选项,当tearoff=1的时候该菜单被设置为可以独立出来的菜单,点击虚线就可以将菜单独立出来,
当tearoff=0时就是正常的菜单了,但是默认情况下tearoff=1,所以在程序中需要设置一下。
from tkinter import *

## 编写一个简易的加减法计算器程序
## 把实现的功能都封装到一个类里面
class Calculator: # 类 Calculator
    def __init__(self): # 构造函数,实例化对象时自动执行这个函数

        window = Tk() # 新建一个Tkinter的窗体window
        window.title("-----Mini Calculator-----") # 窗体标题
        # Create a menu bar
        menubar = Menu(window) #创建菜单,父容器为window
        window.config(menu = menubar) # config可以设置tkinter组件的样式参数()。Display the menu bar
        # create a pulldown menu, and add it to the menu bar
        operationMenu = Menu(menubar, tearoff = 0) # 在menubar上建菜单operationMenu,tearoff = 0表示菜单无法单独显示 ()
        menubar.add_cascade(label = "Operation", menu = operationMenu) # 以级联形式添加菜单
        operationMenu.add_command(label = "Add", command = self.add) # 添加菜单项,菜单显示文本"Add",单击执行self.add
        operationMenu.add_separator() # 添加分割线
        operationMenu.add_command(label = "Subtract", command = self.subtract)# 添加菜单项,菜单显示文本"Subtract",单击执行self.subtract
        # create more pulldown menus
        exitmenu = Menu(menubar, tearoff = 0)
        menubar.add_cascade ( label = "Exit", menu = exitmenu )
        exitmenu.add_command ( label = "Quit", command = window.destroy )
        # Add a tool bar frame
        frame0 = Frame(window) # Frame是一种容器 Create and add a frame to window
        frame0.grid(row = 1, column = 1, sticky = W) # 把frame0放到window的1行1列位置;参见
        # Add labels and entries to frame1
        frame1 = Frame ( window )
        frame1.grid ( row = 2, column = 1, pady = 10 ) # 把frame1放到window的2行1列位置;
        Label ( frame1, text = "Number 1:" ).pack ( side = LEFT ) # Label 的文本为 "Number 1:",放置到左边
        self.v1 = StringVar ( value = '0' ) #
        Entry(frame1, width = 5, textvariable = self.v1, justify = RIGHT).pack(side=LEFT)
        Label ( frame1, text = "Number 2:" ).pack(side = LEFT )
        self.v2 = StringVar ( value = '0' )
        Entry(frame1,width = 5, textvariable = self.v2, justify = RIGHT).pack(side=LEFT)
        Label ( frame1, text = "Result:" ).pack(side = LEFT )
        self.v3 = StringVar ( value = '0' )
        Entry(frame1,width = 5, textvariable = self.v3, justify = RIGHT ).pack(side=LEFT)

        # Add buttons to frame2
        frame2 = Frame(window) # Create and add a frame to window
        frame2.grid(row = 3, column = 1, pady = 10, sticky = E )
        Button(frame2, text = "Add", command = self.add ).pack( side = LEFT )
        Button(frame2, text = "Subtract", command = self.subtract ).pack( side = LEFT )
        mainloop()

    def add(self):
        self.v3.set ( eval( self.v1.get() ) + eval( self.v2.get() ) )

    def subtract(self):
        number1 = eval( self.v1.get() )
        number2 = eval( self.v2.get() )
        self.v3.set ( number1 - number2 )

Calculator() # Create GUI 实例化对象