设计模式概览
各类型对比
|
分类 |
定义 |
侧重点 |
适用案例 |
使用方式 |
优势 |
缺陷 |
单例模式 |
|
确认类只有一个对象,并提供一个全局方法来获取这个对象。 |
|
获取日志工具 |
能产生唯一对象的类提供全局方法;把唯一的类对象设置为静态的类。 |
防止类对象被任意生成而造成系统错误;获取类对象方便。 |
容易过度使用。 |
状态模式 |
|
让一个对象的行为随着内部状态的改变而变化,状态改变之后就像是改变了类一样 |
|
场景转换 |
定义一个各状态通用的接口;各状态继承整个接口定义内部状态。然后再用一个脚本来控制切换。 |
降低维护难度;状态执行环境单一;一些状态可以项目之间共享。 |
状态很多的时候容易类爆量。 |
观察者模式 |
对象行为型 |
在对象之间定义一个一对多的连接方法,当一个对象变换状态的时候,其他关联的对象也会自动收到通知。 |
侧重对于观察者的管理,观察者可以决定订阅或者退订。 |
成就系统 |
建立发布者和订阅者之间的关系; 发布者发布信息的时候,通知所有的订阅者 |
游戏事件发生的时候不必处理后续的逻辑。 |
容易类过多;解决方案是注册的时候使用回调函数而不是类对象,然后再用同一个类来管理这些回调函数。 |
命令模式 |
对象行为型 |
将请求封装成对象,将客户端不同的请求参数化,并配合队列、记录、复原等方法来执行请求的操作。 |
侧重对于命令的管理(对于命令的增加、删除、记录、撤销等)。 |
网络中封包的传递 |
封装请求; 操作请求。 |
命令被封装为对象之后,可以为命令的执行加上额外操作或者参数化。 |
容易类爆量。 |
简单工厂模式 |
类创建型 |
工厂对象决定创建哪一种产品的实例。 |
|
|
|
实现对象的创建和使用的分离 |
不够灵活,如果新增一个产品就需要修改工厂类,违背了开闭原则。 |
工厂模式 |
类创建型 |
定义一个可以产生对象的接口,让子类决定要产生哪一个类的对象。 |
将类“产生对象的流程”进行集合管理的模式。 |
|
先定义一个产生对象的接口,然后让子类去决定生产哪一种对象。 |
能对对象产生的流程制定规则 减少客户端参与对象生成的过程 |
当类群组过多的时候,会出现子类爆量或者switch语句过长的问题 |
抽象工厂模式 |
类创建型 |
提供一个能够建立整个类群组或有关联的对象,而不必指明他们的具体类。 |
|
|
系统中先定义一组抽象类,这些抽象类的子类,是根据不同的执行环境产生的。 |
扩展了具体工厂的功能,使得一个工厂可以生产多个大类。能将产生的对象整组转换到不同的类群组上。 |
|
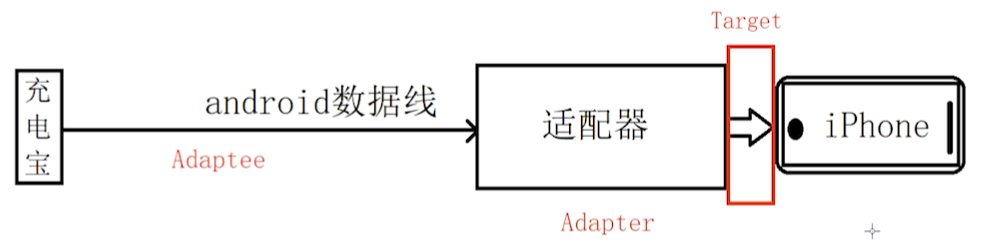
适配器模式 |
|
将一个类的接口转换成客户端期待的类接口,让原本接口不兼容的类可以一起工作。 |
侧重使得不兼容的类变得兼容 |
俘虏野怪;转换不同版本的UI插件 |
关联(内部创建一个私有的被适配对象实例进行方法调用)或者继承(通过继承调用父类对象和方法) |
类型转换; 隔离项目和第三方库,减少对于第三方库的依赖。 |
|
分类
对象行为型模式:观察者模式 & 命令模式
命令模式和观察者模式都是着重将“发生”和“执行”两个操作消除耦合的模式。当观察者模式中只有一个观察者的时候,很类似于命令模式。但两者的侧重点不同:
命令模式:侧重对于命令的管理(增加、删除、记录、撤销等)
观察者模式:侧重对于观察者的管理,观察者可以决定订阅或者退订
创建类模式
主要是工厂家族。
- 简单工厂类虽然对于小型项目来说修改简单,但是因为需要修改工厂类,所以违背了开闭原则。
- 工厂类中新增一个生产的产品需要新增一个类,在新增的类中实现生产过程。
- 只有一个体系的抽象工厂模式就是工厂模式。新增产品体系的时候需要修改原有的工厂类,违反开闭原则。
三者的抽象程度递增。
各设计模式案例
单例模式
衍生于全局静态变量。全局静态变量有两个问题:(1)无法避免产生第二个对象;(2)容易产生全局变量重复?(没太理解)
- 单例模式的意义:(1)同时间只存在一个对象;(2)提供了一个快速获取这个对象的方法。
- 使用的场景:确定这个类的对象只有一个,并且不会被继承(因为他的构造函数被私有化了)。
以下代码重点演示单例的会是同一个地址,返回同一个哈希值
using System.Collections;
using System.Collections.Generic;
using UnityEngine;


public class MySingleton
{
    private static MySingleton instance;

    public static MySingleton Instance
    {
        get
        {
            if (instance == null)
                instance = new MySingleton();
            return instance;
        }
    }

    private MySingleton()
    {
        Debug.Log("构造函数执行");
    }

    public void Show()
    {
        Debug.Log("Show");
    }

}
public class DesignPattern : MonoBehaviour
{
    // Start is called before the first frame update
    void Start()
    {
        MySingleton single1 = MySingleton.Instance;
        single1.Show();
        Debug.Log(single1.GetHashCode());

        MySingleton single2 = MySingleton.Instance;
        single2.Show();
        Debug.Log(single2.GetHashCode());

        MySingleton single3 = MySingleton.Instance;
        single3.Show();
        Debug.Log(single3.GetHashCode());
        //以上这三个对象指向同一个地址
    }
}
以下是一个我自己的游戏demo中使用的泛型单例脚本:
using System.Collections;
using System.Collections.Generic;
using UnityEngine;

public class Singleton<T> : MonoBehaviour where T : Singleton<T>
{
    private static T instance;
    public static T Instance
    {
        get { return instance;  }
    }

   protected virtual void Awake()
    {
        if (instance != null)
            Destroy(gameObject);//保证只有一个实例,如果之前有的话,先销毁
        else
            instance = (T)this;
    }

    protected virtual void OnDestroy()
    {
        if (instance == this)
        {
            instance = null;
        }
    }

    public static bool IsInitialized
    {
        get { return instance != null; }
    }
}
状态模式
参考文章:https://blog.csdn.net/m0_52361859/article/details/125588594
概述:他将复杂的逻辑判断提取到不同状态对象中,允许状态对象在其内部状态发生改变时,改变其行为。状态的改变和各个状态的行为是状态模式的核心。衍生于switch状态切换,然而switch状态切换的使用中,如果后续有新增的状态需要修改state部分;而状态模式中不需要 。
- 优势:结构清晰;后续增加的时候成本低;易于维护。
- 缺陷:如果状态很多,导致产生的类的数量太多。
行为树和状态机
对于状态不复杂的人物AI,可以通过状态模式来实现角色的AI行为。
|
有限状态机 |
行为树 |
概念 |
在不同阶段会呈现出不同运行状态的系统 这些状态是有限的、不重叠的 |
本质上是AI,涵盖了层次状态机、事件调度、事件计划、行为等 |
基本节点 |
状态 |
行为,是高度模块化的状态,去掉了状态中的跳转逻辑 |
跳转 |
任意跳转,实现简单 某一时刻一定处于其中的一个状态 |
跳转时通过父节点的类型来决定的,可以并行处理两个行为 |
复用性 |
复用性差 |
通过增加父节点的类型,可以复用行为 |
命令模式
概述:对象行为型模式,通过将请求者和执行者之间的请求抽离出来封装成一个对象,从而使发出请求的职责和执行请求的职责分离。请求者和执行者通过命令对象来进行沟通,这样使得对命令对象进行存储,管理,传递等。
可以分为两个部分:请求的封装、请求的操作。
实现的效果:解耦、可改变命令对象(对象可参数化)、对象的撤销
优劣:
- 优势:单一职责,调用者和实现者分离
- 劣势:会产生大量的命令类,使得系统更加的复杂
代码案例:
代码1:抽象的命令层
public abstract class Commond//这里单词拼错了还请忽略
{
    public abstract void Execute(GameObject player);
    //抽象方法只能存在于抽象类中
    public abstract void Undo();
}
代码2:游戏主脚本,进行输入和调用
public class GameRoot : MonoBehaviour
{
    public GameObject player;
    //首先实例化
    MoveForward forward = new MoveForward();
    MoveBack back = new MoveBack();

    void Update()
    {
        PlayerInputHandler();
    }

    private void PlayerInputHandler()
    {
        if (Input.GetKeyDown(KeyCode.W))
        {
            forward.Execute(player);
            CommandManager.Instance.AddCommands(forward);

        }
        if (Input.GetKeyDown(KeyCode.S))
        {
            back.Execute(player);
            CommandManager.Instance.AddCommands(back);
        }
        if (Input.GetKeyDown(KeyCode.D))
        {
            StartCoroutine(CommandManager.Instance.UndoStart());
        }
    }
}
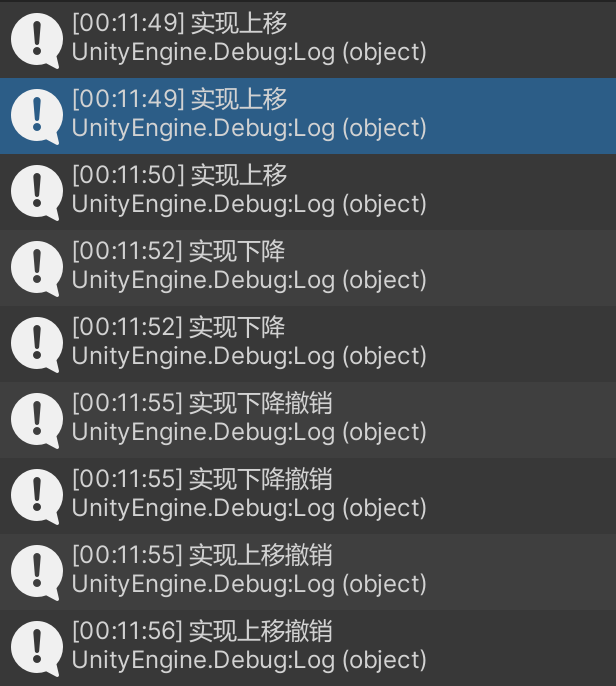
代码3:命令的管理脚本,主要用来执行撤销动作
public class CommandManager : MonoBehaviour
{
    public static CommandManager Instance;

    private readonly List<Commond> commandList = new List<Commond>();

    private void Awake()
    {
        if (Instance) Destroy(Instance);
        else Instance = this;
    }

    public void AddCommands(Commond commond)
    {
        commandList.Add(commond);
    }

    public IEnumerator UndoStart()
    {
        commandList.Reverse();//逆转
        foreach(Commond commond in commandList)
        {
            yield return new WaitForSeconds(.2f);
            commond.Undo();
        }
        commandList.Clear();
    }
}
输出效果:
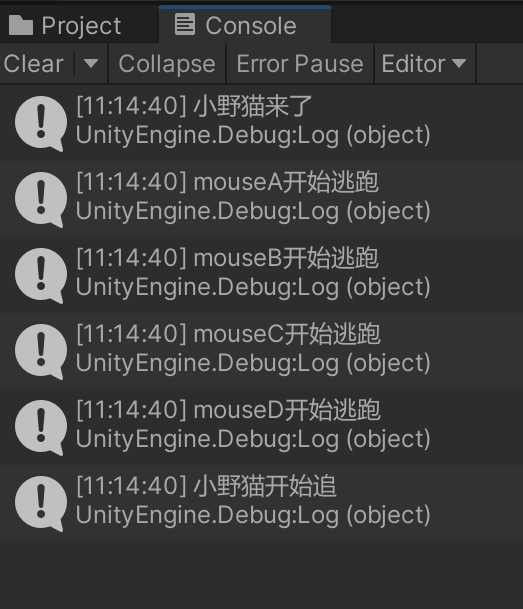
观察者模式
概述:简单来说就是在事件的发布者中定义一个委托,在事件响应者中向这个委托中添加响应方法。然后在适当的时候触发这个委托方法,响应者注册的方法就也会执行了。
代码示例:
using System.Collections;
using System.Collections.Generic;
using UnityEngine;
using System;

//这里介绍观察者模式
//例子是:猫来了,所有的老鼠开始逃跑

public class Animal//这是一个父类
{
    protected string strName;

    public Animal(string name)//构造函数
    {
        this.strName = name;
    }

    public virtual void Run()//父类中的虚方法
    {

    }
}

public class Cat: Animal
{
    public Action action;//发布者
    public Cat(string name):base(name)//构造函数
    {
    }

    public void Coming(/*Animal mouseA, Animal mouseB, Animal mouseC*/)
    {
        Debug.Log(strName + "来了");
        //mouseA.Run();
        //mouseB.Run();
        //mouseC.Run();
        //在没有观察者模式的时候需要挨个调用

        if (action != null)
            action();//触发事件;通过多播委托完成一对多的关系

        this.Run();
    }

    public override void Run()//函数的重载
    {
        Debug.Log(strName + "开始追");
    }
}

public class Mouse: Animal
{
    public Mouse(string name, Cat cat):base(name)
    {
        cat.action += this.Run;//订阅者
    }

    public override void Run()//事件处理器
    {
        Debug.Log( strName + "开始逃跑");
    }
}

public class ObserverPattern : MonoBehaviour
{
    // Start is called before the first frame update
    void Start()
    {
        Cat cat = new Cat("小野猫");

        Animal mouseA = new Mouse("mouseA", cat);
        Animal mouseB = new Mouse("mouseB", cat);
        Animal mouseC = new Mouse("mouseC", cat);
        Animal mouseD = new Mouse("mouseD", cat);

        //cat.Coming(mouseA, mouseB, mouseC);
        cat.Coming();
    }
}
运行结果:
以下代码展示观察者模式和非观察者模式的写法差异
//普通写法
//缺点在于如果后续需要新增相应的对象,那么每次都需要在cat的函数中手动新增响应对象
public class Cat: Animal
{
    public Cat(string name):base(name)//构造函数
    {
    }

    public void Coming(Animal mouseA, Animal mouseB, Animal mouseC)
    {
        Debug.Log(strName + "来了");
        mouseA.Run();
        mouseB.Run();
        mouseC.Run();
        this.Run();
    }

    public override void Run()//函数的重载
    {
        Debug.Log(strName + "开始追");
    }
}

//观察者模式的写法
public class Cat: Animal
{
    public Action action;
    public Cat(string name):base(name)//构造函数
    {
    }

    public void Coming(Animal mouseA, Animal mouseB, Animal mouseC)
    {
        Debug.Log(strName + "来了");
        if(action!= null)
            action();//在Mouse的构造函数中将其Run方法注册给这个cat的
        this.Run();
    }

    public override void Run()//函数的重载
    {
        Debug.Log(strName + "开始追");
    }
}

public class Mouse: Animal
{
    public Mouse(string name, Cat cat):base(name)
    {
        cat.action += this.Run;//订阅者
    }

    public override void Run()//事件处理器
    {
        Debug.Log( strName + "开始逃跑");
    }
}
工厂家族
简单工厂模式
创建型模式,本质上是一种静态工厂方法模式(Static Factory Method)。需要先定义一个可以产生对象的接口,但是让子类去决定要产生哪一个类的对象。工厂模式使得实例化程序延迟到子类中实现。
主要思想:
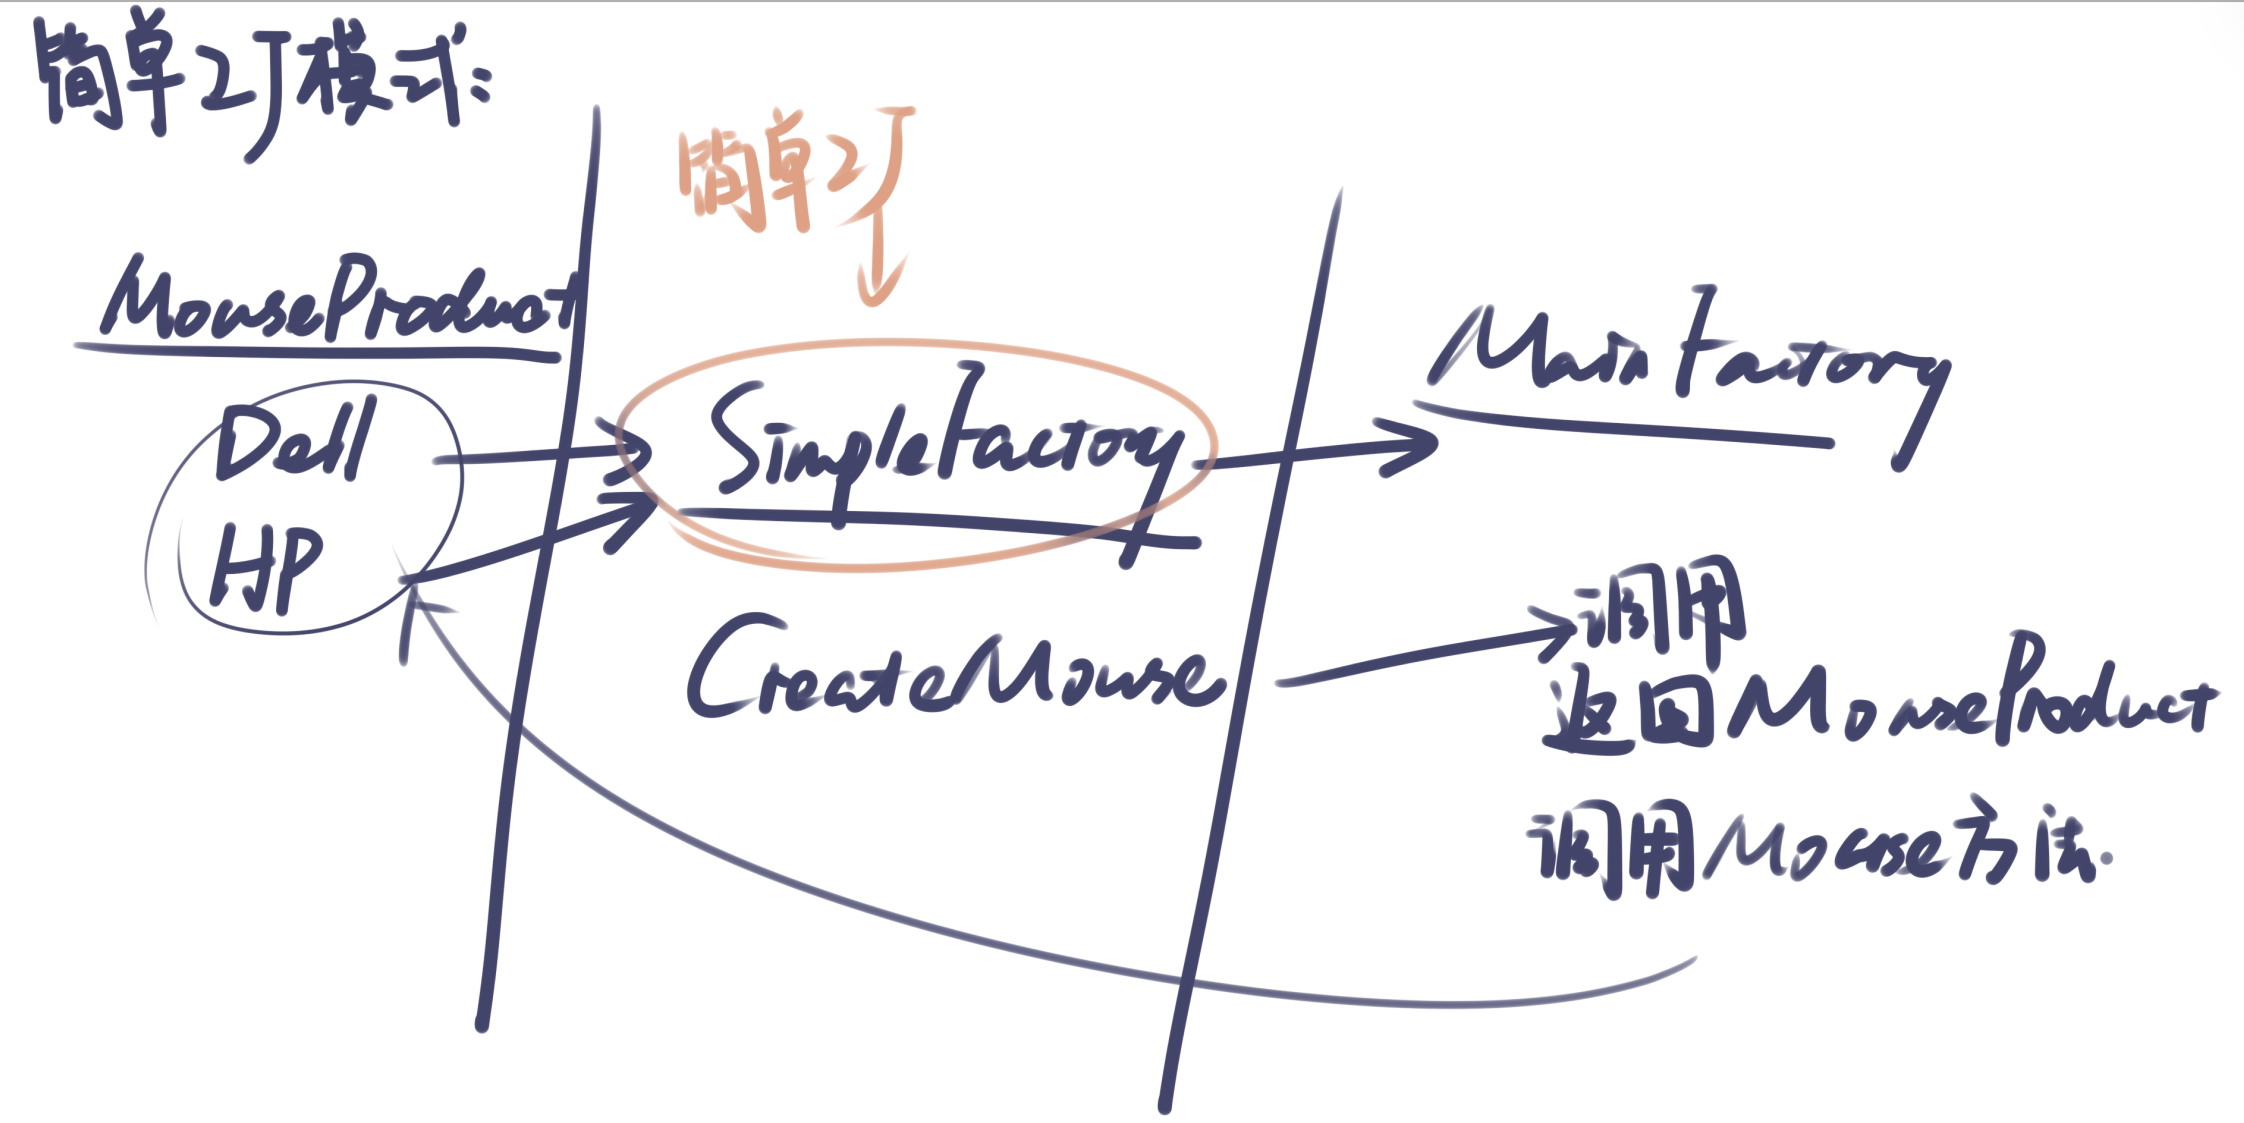
我们创建了两个脚本,包含四个类:
- MouseProduct:父类,还有两个品牌的子类Dell和HP
- MainFactory:一个MainFactory类+一个SimpleFactory类,SimpleFactory类在MainFactory中进行调用;其中SimpleFactory类中还用到了一个枚举
MouseProduct脚本:
using System.Collections;
using System.Collections.Generic;
using UnityEngine;

namespace MouseManufactoring
{
    public abstract class MouseProduct
    {
        public abstract void Print();
    }

    public class DellMouse : MouseProduct
    {
        public override void Print()
        {
            Debug.Log("生产了一个戴尔鼠标");
        }
    }

    public class HpMouse : MouseProduct
    {
        public override void Print()
        {
            Debug.Log("生产了一个HP鼠标");
        }
    }
}
MainFactory脚本:
using System.Collections;
using System.Collections.Generic;
using UnityEngine;
using MouseManufactoring;

public enum MouseType { DellMouse, HpMouse,};

public class MainFactory : MonoBehaviour
{
    void Start()
    {
        RunFactoryMode();
    }

    public void RunNormal()
    {
        DellMouse dellMouse = new DellMouse();
        dellMouse.Print();

        HpMouse hpMouse = new HpMouse();
        hpMouse.Print();
    }

    public void RunFactoryMode()
    {
        SimpleFactory simpleFactory = new SimpleFactory();//将简单工厂实例化

        simpleFactory.CreateMouse(MouseType.DellMouse).Print();
        simpleFactory.CreateMouse(MouseType.HpMouse).Print();
    }

}


public class SimpleFactory
{
    public MouseProduct CreateMouse(MouseType type)
    {
        MouseProduct mouse = null;
        switch (type)
        {
            case MouseType.DellMouse:
                mouse =  new DellMouse();
                break;
            case MouseType.HpMouse:
                mouse =  new HpMouse();
                break;
        }

        return mouse;
    }
}
也可以做如下改造使得可以控制生产的品牌:
public enum MouseType { DellMouse, HpMouse,};

public class MainFactory : MonoBehaviour
{
    public MouseType brand;
    void Start()
    {
        RunFactoryMode(brand);
    }

    public void RunNormal()
    {
        DellMouse dellMouse = new DellMouse();
        dellMouse.Print();

        HpMouse hpMouse = new HpMouse();
        hpMouse.Print();
    }

    public void RunFactoryMode(MouseType type)
    {
        SimpleFactory simpleFactory = new SimpleFactory();//将简单工厂实例化

        simpleFactory.CreateMouse(type).Print();
    }
}
缺陷:简单工厂模式如果需要再增加一个产品,需要新建一个类、枚举,并且需要修改CreateMouse的方法,违背了开闭原则。
工厂模式
关键词:解决简单工厂模式中,新增产品品牌的时候,需要直接修改工厂类的问题。
解决了简单工厂模式中出现的开闭原则问题,一个中间件只能生产一种产品。以下展示了简单工厂和工厂模式的区别。
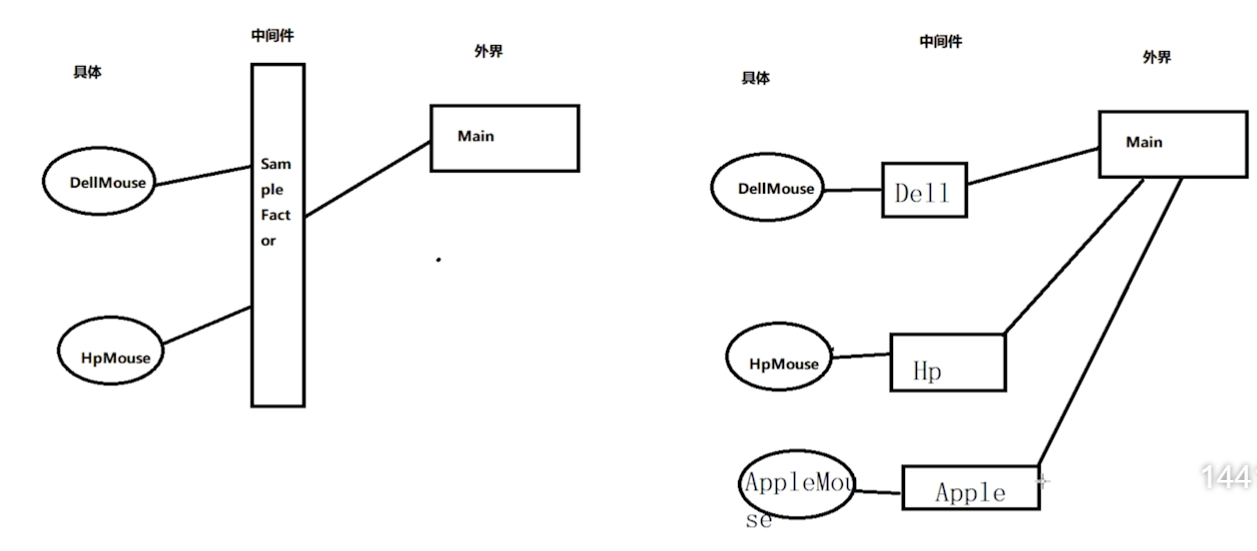
本次我们创建了3个脚本:
- 产品脚本:由一个抽象类和其子类组成,子类分别代表不同的品牌,包含各自的Print函数
- 中间件脚本:由一个抽象类和其子类组成,子类分别代表不同品牌的工厂,包含各自的生产函数
- 主要工厂脚本:挂载在游戏物体上,在Start中调用一个运行方法
产品脚本:
using System.Collections;
using System.Collections.Generic;
using UnityEngine;

namespace FactoryPattern
{
    public abstract class PorductFactoryPattern
    {
        public abstract void Print();
    }

    public class DellMouse: PorductFactoryPattern
    {
        public override void Print()
        {
            Debug.Log("生产了一个Dell鼠标");
        }
    }

    public class HPMouse : PorductFactoryPattern
    {
        public override void Print()
        {
            Debug.Log("生产了一个HP鼠标");
        }
    }
}
中间件脚本:
using System.Collections;
using System.Collections.Generic;
using UnityEngine;
using FactoryPattern;
public abstract class MidBase
{
    public abstract PorductFactoryPattern CreateMouse();
}

public class DellFactoryMid: MidBase//Dell中间件
{
    public override PorductFactoryPattern CreateMouse()
    {
        return new DellMouse();
    }
}

public class HPFactoryMid: MidBase//HP中间件
{
    public override PorductFactoryPattern CreateMouse()
    {
        return new HPMouse();
    }
}
主要工厂脚本:
using System.Collections;
using System.Collections.Generic;
using UnityEngine;
using FactoryPattern;

public class MainFactoryPattern : MonoBehaviour
{
    void Start()
    {
        RunFactoryMode();
    }

    public void RunNormal()//普通模式的运行方法
    {
        DellMouse dellMouse = new DellMouse();
        dellMouse.Print();

        HPMouse hpMouse = new HPMouse();
        hpMouse.Print();
    }

    public void RunFactoryMode(MouseType type)//简单工厂模式的运行方法
    {
        SimpleFactory simpleFactory = new SimpleFactory();//将简单工厂实例化
        simpleFactory.CreateMouse(type).Print();
    }

    public void RunFactoryMode()
    {
        DellFactoryMid dellFactoryMid = new DellFactoryMid();
        dellFactoryMid.CreateMouse().Print();

        HPFactoryMid hpFactoryMid = new HPFactoryMid();
        hpFactoryMid.CreateMouse().Print();
    }
}
抽象工厂模式
关键词:解决生产系列产品的问题,比如我们不只是生产鼠标,我们还生产键盘
具体的脚本构成:
鼠标脚本:鼠标抽象父类+鼠标子类
键盘脚本:键盘抽象父类+键盘子类
中间件脚本:中间件抽象父类+中间件子类(生成鼠标和键盘)
主要工厂脚本:Start中调用运行方法
适配器模式(Adapter Pattern)
脚本构成:
具体数据线脚本:可以用抽象父类,也可以不用
适配器脚本:根据枚举判断不同的类型调用各自的方法
主要调用脚本:在Start中进行调用
具体数据线脚本:
using System.Collections;
using System.Collections.Generic;
using UnityEngine;

namespace AdapterPattern
{
    public abstract class Lines
    {
        public abstract void Charge();
    }

    public class AndroidLine: Lines
    {
        public override void Charge()
        {
            Debug.Log("这是安卓充电线在充电中……");
        }
    }

    public class IOSLine: Lines
    {
        public override void Charge()
        {
            Debug.Log("这是苹果充电线在充电中……");
        }
    }
}
适配器脚本:
using System.Collections;
using System.Collections.Generic;
using UnityEngine;
using AdapterPattern;

public interface IAdapter
{
    void Charge(LineType type);
}

public enum LineType { None, ios, android, };

public class Adapter: IAdapter
{
    AndroidLine androidLine = new AndroidLine();
    IOSLine iOSLine = new IOSLine();
    public void Charge(LineType type)
    {
        if (type == LineType.ios)
        {
            iOSLine.Charge();
        }
        else if (type == LineType.android)
        {
            androidLine.Charge();
        }
    }
}
主要调用脚本:
using System.Collections;
using System.Collections.Generic;
using UnityEngine;
using AdapterPattern;

public class MainAdapter : MonoBehaviour
{
    public LineType type;
    // Start is called before the first frame update
    void Start()
    {
        Adapter adapter = new Adapter();
        //IAdapter adapter = new Adapter();
        //这里这种写法也是可以的,还没有弄懂为什么,记个Todo
        adapter.Charge(type);
    }
}
事件系统(待补充)
MVC
MVC概览
参考文档:
https://blog.csdn.net/qq_39574690/article/details/80757261?ops_request_misc=%257B%2522request%255Fid%2522%253A%2522166920790116782414943044%2522%252C%2522scm%2522%253A%252220140713.130102334..%2522%257D&request_id=166920790116782414943044&biz_id=0&utm_medium=distribute.pc_search_result.none-task-blog-2~all~sobaiduend~default-3-80757261-null-null.142^v66^control,201^v3^add_ask,213^v2^t3_control1&utm_term=mvc%20unity&spm=1018.2226.3001.4187
MVC && MVVM
|
MVC |
MVP |
MVVM |
处理业务逻辑 |
Controller |
Presenter |
ViewModel |
效果
|
View是依赖Model的,会有一些逻辑在View中实现;并且单独修改View是比较困难的 |
所有的交互都发生在presenter内部 |
将View和Model的通信封装在VM中,进行双向通信 |
通信 |
单向 |
|
双向 |
缺陷 |
View对model的访问效率低 View层也会处理业务逻辑 |
代码清晰但是会增加很多类; |
代码量大 |
优势 |
耦合性低,部署快 |
高效的使用model; 使得View和Model之间不存在耦合; 也使得View层不用接触业务逻辑 |
充分解耦,模块清晰 |
适合场景 |
小型项目 |
中型项目 |
|
参考文献
《设计模式和游戏完美开发》蔡升达


