Step 1:Bundle构建、加载、更新
(1)搭建Build工具
AB包的意义:如果我们将资源都放在Resources中,我们客户端的大小会越来越大。所以我们希望将资源打包放到服务端,使用的时候客户端到服务端去下载,这样就可以达到缩包的效果。
1)导入xLua
将xlua中Asset目录下的文件保持这个结构拖到我们的项目中。
2)查找BuildResources下的资源文件
进行格式转换和拼接
查找依赖资源
3)使用BuildPipeline构建AB包
BundleBuild策略:
|
按文件夹打包 |
按文件打包 |
优势 |
Bundle的数量少 |
更新的补丁小 |
劣势 |
后期更新的时候补丁大 |
首次下载的时候慢 |
打包的代码参考:
using System.Collections;
using System.Collections.Generic;
using System.IO;
using System.Linq;
using UnityEditor;
using UnityEngine;

public class BuildTool : Editor
{
    [MenuItem("Tools/Build Windows Bundle")]
    static void BundleWindowsBuild()
    {
        Build(BuildTarget.StandaloneWindows);
    }

    [MenuItem("Tools/Build Android Bundle")]
    static void BundleAndroidBuild()
    {
        Build(BuildTarget.Android);
    }

    [MenuItem("Tools/Build IOS Bundle")]
    static void BundleIOSBuild()
    {
        Build(BuildTarget.iOS);
    }

    static void Build(BuildTarget target)
        {
            List<AssetBundleBuild> assetBundleBuilds = new List<AssetBundleBuild>();
            List<string> bundleInfos = new List<string>();
            string[] files = Directory.GetFiles(PathUtil.BuildResourcesPath, "*", SearchOption.AllDirectories);
            for (int i=0; i<files.Length; i++)
            {
                if (files[i].EndsWith(".meta")) continue;//meta文件是不用打包的

                AssetBundleBuild assetBundle = new AssetBundleBuild();
                string fileName = PathUtil.GetStandardPath(files[i]);//文件的格式进行标准化
                Debug.Log("FileName : " + fileName);

                string assetName = PathUtil.GetUnityPath(fileName);//截取asset之后的部分作为assetname属性
                assetBundle.assetNames = new string[] { assetName };
                Debug.Log("AssetName: " + assetName );

                string bundleName = fileName.Replace(PathUtil.BuildResourcesPath, "").ToLower();//标准化之后将BuildResource以及之前的部分都替换掉,作为Bundle的名字
                assetBundle.assetBundleName = bundleName + ".ab";//Bundle的后缀改为ab
                Debug.Log("AssetBundleName: " + bundleName + ".ab");
                assetBundleBuilds.Add(assetBundle);

                //添加依赖信息
                List<string> dependenceInfo = GetDependence(assetName);
                string bundleInfo = assetName + "|" + bundleName + ".ab";

                if (dependenceInfo.Count > 0)
                    bundleInfo = bundleInfo + "|" + string.Join("|", dependenceInfo);

                bundleInfos.Add(bundleInfo);
            }

            if (Directory.Exists(PathUtil.BundleOutPath)) Directory.Delete(PathUtil.BundleOutPath, true);
            //创建输出的目标
            Directory.CreateDirectory(PathUtil.BundleOutPath);

            //这个就是打包
            BuildPipeline.BuildAssetBundles(PathUtil.BundleOutPath, assetBundleBuilds.ToArray(), BuildAssetBundleOptions.None, target);
            File.WriteAllLines(PathUtil.BundleOutPath + "/" , bundleInfos);

            AssetDatabase.Refresh();
        }

    //这是获取依赖文件
    static List<string> GetDependence(string curFile)
    {
        List<string> dependence = new List<string>();

        string[] files = AssetDatabase.GetDependencies(curFile);//这是一个正向查找依赖的接口,用于查找当前资源所依赖的资源
        dependence = files.Where(file => !file.EndsWith(".cs") && !file.Equals(curFile)).ToList();
        return dependence;
    }
}
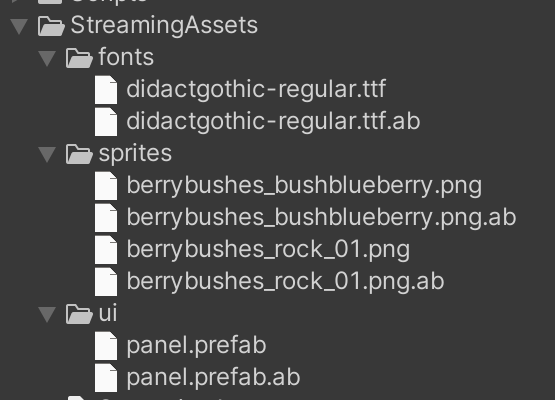
点击运行之后创建的文件:

4)加载AB资源:
using System.Collections;
using System.Collections.Generic;
using UnityEngine;

public class LoadAB : MonoBehaviour
{
   IEnumerator Start()
    {
        AssetBundleCreateRequest request = AssetBundle.LoadFromFileAsync(Application.streamingAssetsPath + "/ui/panel.prefab.ab");
        yield return request;

        AssetBundleRequest bundleRequest = request.assetBundle.LoadAssetAsync("Assets/BuildResources/UI/Panel.prefab");
        yield return bundleRequest;

        GameObject go = Instantiate(bundleRequest.asset) as GameObject;
        go.transform.SetParent(this.transform);
        go.SetActive(true);
        go.transform.localPosition = Vector3.zero;
    }
}
但是这种方式如果依赖资源没有加载,会造成依赖资源的丢失。
(2)建立版本管理系统
版本信息管理:

查找依赖文件并且进行保存:

(3)资源管理器
接着我们创建一个资源管理器进行文件的加载。
using Assets.Scripts;
using System;
using System.Collections;
using System.Collections.Generic;
using System.IO;
using UnityEngine;
using UObject = UnityEngine.Object;

public class ResourceManager : MonoBehaviour
{
    internal class BundleInfo
    {
        public string AssetName;
        public string BundleName;
        public List<string> Dependences;
    }

    //存放bundle信息
    private Dictionary<string, BundleInfo> m_BundleInfos = new Dictionary<string, BundleInfo>();


    public void ParseVersionFile()
    {
        //拿到版本文件路径
        string url = Path.Combine(PathUtil.BundleResourcePath, AppConst.FileListName);//框架层
        //读取
        string[] data = File.ReadAllLines(url);//一行一行的读

        //解析文件信息
        for (int i = 0; i < data.Length; i++)
        {
            BundleInfo bundleInfo = new BundleInfo();
            string[] info = data[i].Split('|');//分割
            bundleInfo.AssetName = info[0];//这个是filelist里面的名字
            bundleInfo.BundleName = info[1];//这个是打好Bundle包之后的资产地址

            //数组,可以动态扩容
            bundleInfo.Dependences = new List<string>(info.Length - 2);
            for (int j = 2; j < info.Length; j++)//索引从2开始才是依赖资源
            {
                bundleInfo.Dependences.Add(info[j]);
            }
            m_BundleInfos.Add(bundleInfo.AssetName, bundleInfo);

            //if (info[0].IndexOf("LuaScripts") > 0)
            //    Manager.Lua.LuaNames.Add(info[0]);
        }
    }


    //internal void LoadLua(string name, Action<UObject> p)
    //{
    //    throw new NotImplementedException();
    //}

    //异步加载资源
    IEnumerator LoadBundleAsync(string assetName, Action<UObject> action = null)
    {
        //获取文件信息
        string bundleName = m_BundleInfos[assetName].BundleName;
        string bundlePath = Path.Combine(PathUtil.BundleResourcePath, bundleName);

        List<string> dependences = m_BundleInfos[assetName].Dependences;

        if (dependences != null && dependences.Count > 0)
        {
            //递归加载依赖资源
            for (int i = 0; i < dependences.Count; i++)
            {
                yield return LoadBundleAsync(dependences[i]);
            }
        }

        //加载Bundle资源
        AssetBundleCreateRequest request = AssetBundle.LoadFromFileAsync(bundlePath);
        yield return request;

        AssetBundleRequest bundleRequest = request.assetBundle.LoadAssetAsync(assetName);
        yield return bundleRequest;
        Debug.Log("This is LoadBundleAsync");
        action?.Invoke(bundleRequest?.asset);
    }

#if UNITY_EDITOR
    void EditorLoadAsset(string assetName, Action<UObject> action = null)
    {
        Debug.Log("This is EditorMode");
        UObject obj = UnityEditor.AssetDatabase.LoadAssetAtPath(assetName, typeof(UObject));

        if (obj == null)
            Debug.LogError("Assets name does not exists: " + assetName);
        action?.Invoke(obj);
    }
#endif

    public void LoadAsset(string assetName, Action<UObject> action)
    {
#if UNITY_EDITOR
        if (AppConst.gameMode == GameMode.EditorMode)
            EditorLoadAsset(assetName, action);
        else
#endif
            StartCoroutine(LoadBundleAsync(assetName, action));
    }

    public void LoadUI(string assetName, Action<UObject> action = null)
    {
        LoadAsset(PathUtil.GetUIPath(assetName), action);
    }

    public void LoadMusic(string assetName, Action<UObject> action = null)
    {
        LoadAsset(PathUtil.GetMusicPath(assetName), action);
    }

    public void LoadSound(string assetName, Action<UObject> action = null)
    {
        LoadAsset(PathUtil.GetSoundPath(assetName), action);
    }

    public void LoadEffect(string assetName, Action<UObject> action = null)
    {
        LoadAsset(PathUtil.GetEffectPath(assetName), action);
    }

    public void LoadScene(string assetName, Action<UObject> action = null)
    {
        LoadAsset(PathUtil.GetScenePath(assetName), action);
    }

    public void LoadLua(string assetName, Action<UnityEngine.Object> action = null)
    {
        LoadAsset(assetName, action);
    }

    public void LoadPrefab(string assetName, Action<UnityEngine.Object> action = null)
    {
        LoadAsset(assetName, action);
    }
}
(4)热更新部分
热更新的方案选择:
|
整包 |
分包 |
含义 |
完整资源放在包内 |
|
优势 |
首次更新时间少 |
安装包下载快 |
劣势 |
安装包下载时间长,首次安装事件久 |
首次更新时间久 |
热更新的步骤:

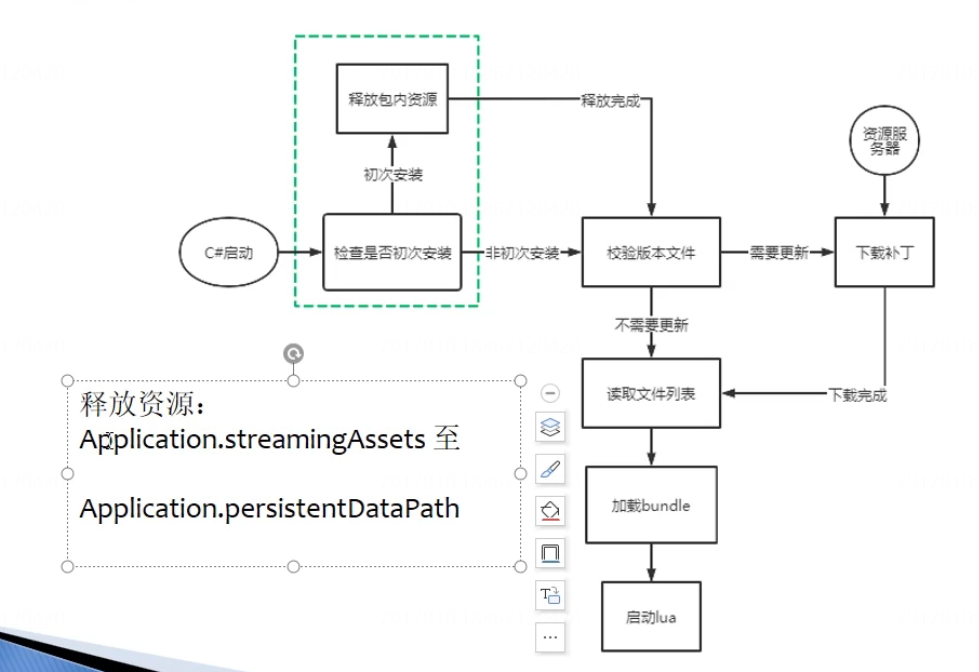
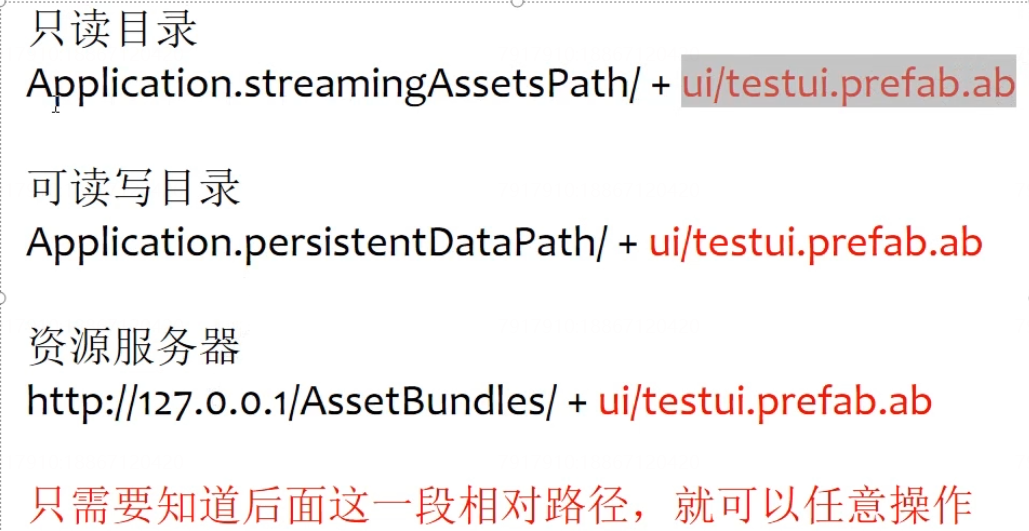
整包策略:streamingasset是只读的,persistentDataPath是可读写的。初次安装的时候将只读目录的内容拷贝到可读写目录,后续检查更新也都是从可读写目录进行更新下载的。
分包策略:直接和可读写目录进行交互。
热更新代码部分:

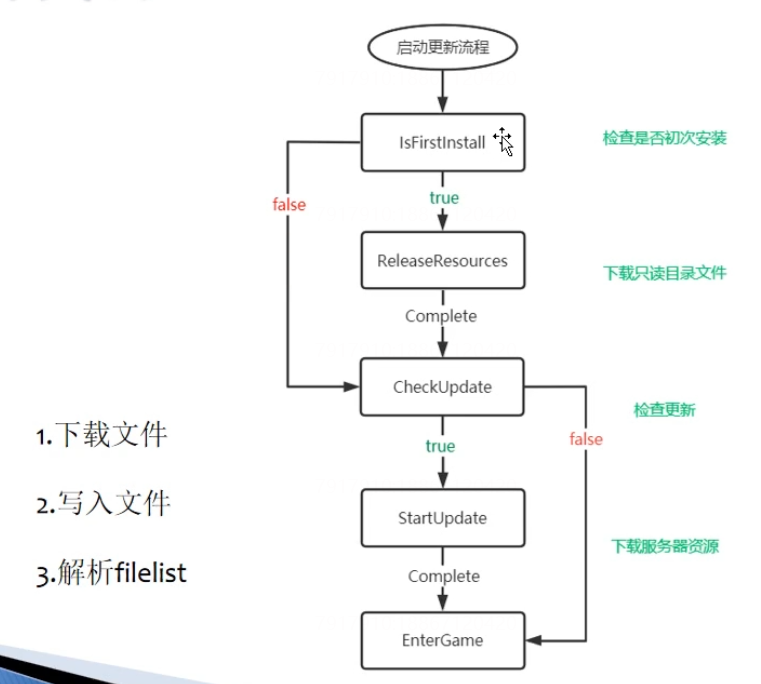
检测初次安装:只读目录有热更新资源、可读写目录没有热更资源、判断filelist文件是否存在。需要注意filelist需要最后写入
检查更新:下载资源服务器上的filelist,对比文件信息和本地是否一致

热更新代码步骤
1)下载文件并完成文件释放
需要提前在创建只读目录和可读写目录
using System;
using System.Collections;
using System.Collections.Generic;
using UnityEngine;
using UnityEngine.Networking;

public class HotUpdate : MonoBehaviour
{
    internal class DownFileInfo
    {
        public string url;

        public string fileName;
        public DownloadHandler fileData;
    }
    //下载文件
    IEnumerator DownLoadFile(DownFileInfo info,Action<DownloadHandler> Complete)
    {
        UnityWebRequest webRequest = UnityWebRequest.Get(info.url);
        yield return webRequest.SendWebRequest();
        //检测
        if(webRequest.isHttpError || webRequest.isNetworkError)
        {
            Debug.Log("下载文件出错"+ info.url);
            yield break;
        }
        info.fileData = webRequest.downloadHandler;
        Complete?.Invoke(info);
        //下载完成之后需要释放掉
        webRequest.Dispose();
    }

    //下载多个文件
    IEnumerator DownLoadFile(List<DownFileInfo> infos, Action<DownloadHandler> Complete, Action DownLoadAllComplete)
    {
        foreach(DownFileInfo info in infos)
        {
            yield return DownLoadFile(info, Complete);
        }
        DownLoadAllComplete?.Invoke();
    }
}
Step 2: 热更新管理器
(1)Lua加载和管理
(2)Lua绑定和执行
Step 3:业务逻辑管理器


